Workflows
Configuring Chatbot Business Rules
After setting up a chatbot, you’ll need to build the Business Rule to activate the bot. Without this, the bot will not appear in the Chat Widget. This applies both to Sequence and Conversational Bots.
In this article:
- Why Do I Need a Business Rule for a Chatbot to Work?
- How to Set Up Chatbot Business Rules
- Chatbot Chaining
Why Do I Need a Trigger for a Chatbot to Work?
You can build as many chatbots as you’d like in Acquire. And there’s a reason for that: we know you’ll need different bots for different use cases. For example, a bot that’s chatting to a new visitor will probably have a different script and set of actions than a bot that’s conversing with a current customer.
So, how do you set the right bots to engage in the right circumstances? This is where Business Rules come in.
Business Rules allow you to set up parameters a visitor must meet before the bot is applied. Some examples include web pages, return visits, source websites, and even account attributes.
How to Set Up Chatbot Business Rules
Set up multiple chatbots through Business Rules. Business Rules help you deploy chatbots that have specialized roles. To get started, go to Settings > Workflows > Business Rules.
Click on 'New Rule' and choose the appropriate entry point. From there, you may build your chatbot workflow with action groups and conditions.
Keep in mind that if two Business Rules have the same trigger and/or entry channel, one may override the other.
In the example below, a user has built a workflow that responds to visitors who enter the chat. The workflow checks if the visitor is on the pricing page, features page, or landing page, and then deploys the appropriate bot.

This Business Rule helps address the problem of multiple bots, and it's easy to manage, edit, and delete chatbots if you need to. Currently, you may add as many as five action groups, so you can deploy up to five different chatbots to your site's different pages. However, what if your visitor asks about pricing on the features page? Or if you have more than five chatbots? In this instance, you should chain your chatbots.
Chatbot Handoff
With chatbot handoff, you can direct a visitor to a Sequence Bot when they bring up a certain question to a Conversational Bot. You can also provide your visitor with a Conversational Bot while they're in a sequence. Or, you can hand off one Sequence Bot to another Sequence Bot.
Handoff a Sequence Bot to a Sequent Bot
It’s a good idea to build a Sequence Bot that specializes in a feature.
For example, you may want to create a branch that asks a visitor to select a bubble action about whether they want to connect with sales or support. Then you can invite the Sales Sequence Bot or Support Sequence Bot based on what action they chose.
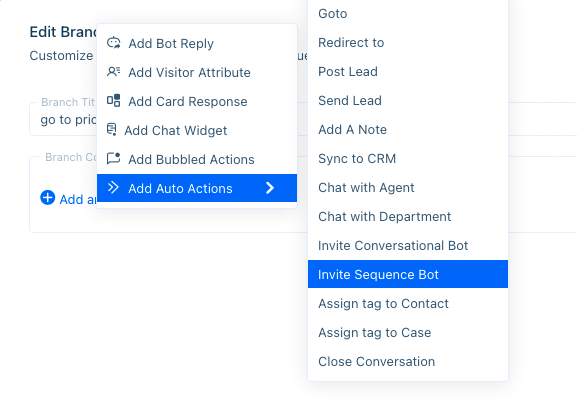
To do so, go to one Sequence Bot and, in a branch, select on Add Another Interaction > Add Action > Invite Sequence Bot. Select the Sequence Bot you’d like to hand the visitor off to.

Keep in mind the visitor will start at the first branch of the flow.
Applying a Sequence Bot to a Conversational Bot
If you have an instance where you want your visitor to enter a sequence when they ask about a certain topic, apply a Sequence Bot. To get started, go to Chatbot > Conversational Bot and select the question you’d like the hand off to occur in. You can also create a question by clicking on ‘Add New Question’.
Once you have the question, scroll down to ‘Enable Post Action’ and set it to active (right, green).
Now, when your visitor brings up pricing, the Conversational Bot will direct the visitor’s queries to the better-equipped Pricing Sequence Bot.
Applying a Conversational Bot to a Sequence Bot
You may also transfer a visitor to a Conversational Bot when they’re on a sequence. To do so, go to Chatbot > Sequence Bot, and select the sequence you’d like the handoff occur in. You may also create a new sequence by clicking on the ‘Create New Sequence’ button.
Once you’ve built out the sequence, select the branch where you’d like the handoff to happen in, and select ‘Add Another Option’ > ‘Add Auto Actions’ > ‘Invite Conversational Bot’, then choose the Conversational Bot you’d like to add.
In this example, when a visitor hits the Features branch, they’re invited to speak with the Features Conversational Bot.
Building chatbots can be surprisingly complex, but with time, they can become an invaluable tool. They can also free up your agents’ time and provide you with better customer insight.
Need a little extra help? Reach out to our customer success team at success@acquire.io.
Was this article helpful?


Date :
Hi Zam Ong. The article has been updated. Please let us know if you have any questions.

2 Comments
SP - Zam Ong
Date :
Hi, I tried to activate chatbots belonging to 2 different groups. When I use the trigger to setup 2 actions so as to apply the 2 chatbot groups, it doesn't work. Please help.