Integrations
OnceHub
We're taking a deeper look at some of our integrations, including this one. In the meantime, some of the functionality described here may not work as expected. Thank you for your patience.
Allow visitors to book meetings using the popular scheduling app, OnceHub. Visitors can book meetings directly from the widget during a live chat, or through a Sequence Bot. During a live chat, agents can share a meeting link by selecting the OnceHub app from the conversation toolbar.

In this article:
- Installing OnceHub
- Using OnceHub During a Live Chat
- Using OnceHub in a Sequence Bot
What you’ll need:
- A OnceHub account
Installing OnceHub
To complete the installation, you’ll need a OnceHub meeting link and API key.
Copying the Meeting Link
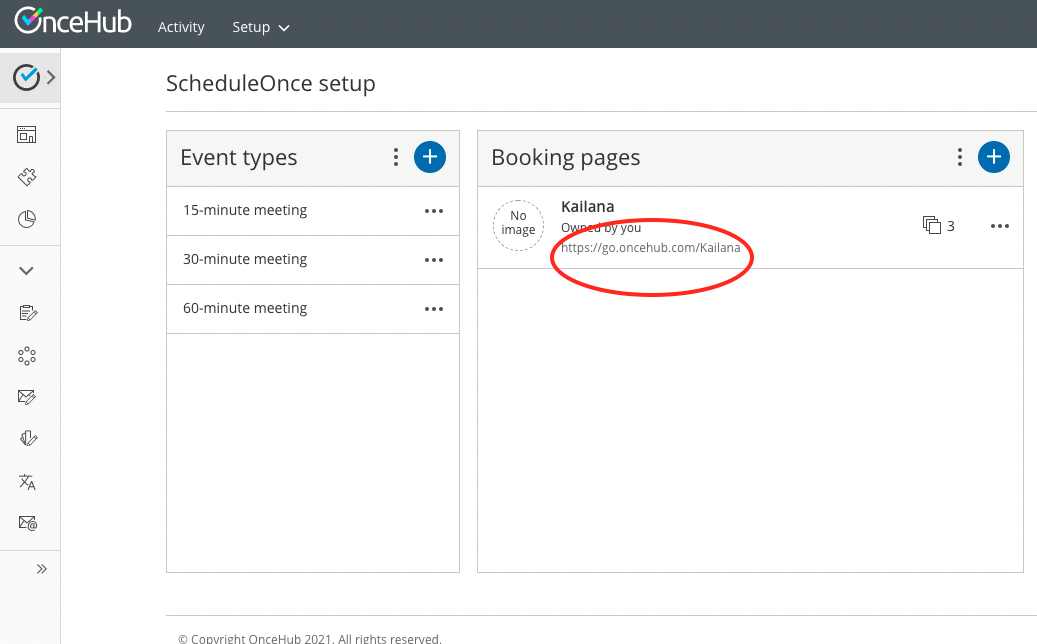
Log in to your OnceHub account and go to Setup > ScheduleOnce Setup. In Book pages, click on the account you’d like to set meetings for. Under Share & Publish, copy the link. Save your meeting link to a word document.
Generating an API Key
In the left panel, click on Integrations > APIs & Webhooks. Generate, regenerate, or copy the key and save it to a safe place.
Installing OnceHub in Acquire

Step 1: To install OnceHub, go to Acquire's App Store. Search for OnceHub in the search bar or select the Widget category.
Step 2: Click ‘Install’ on the OnceHub tile. Then Authorize the app integration.
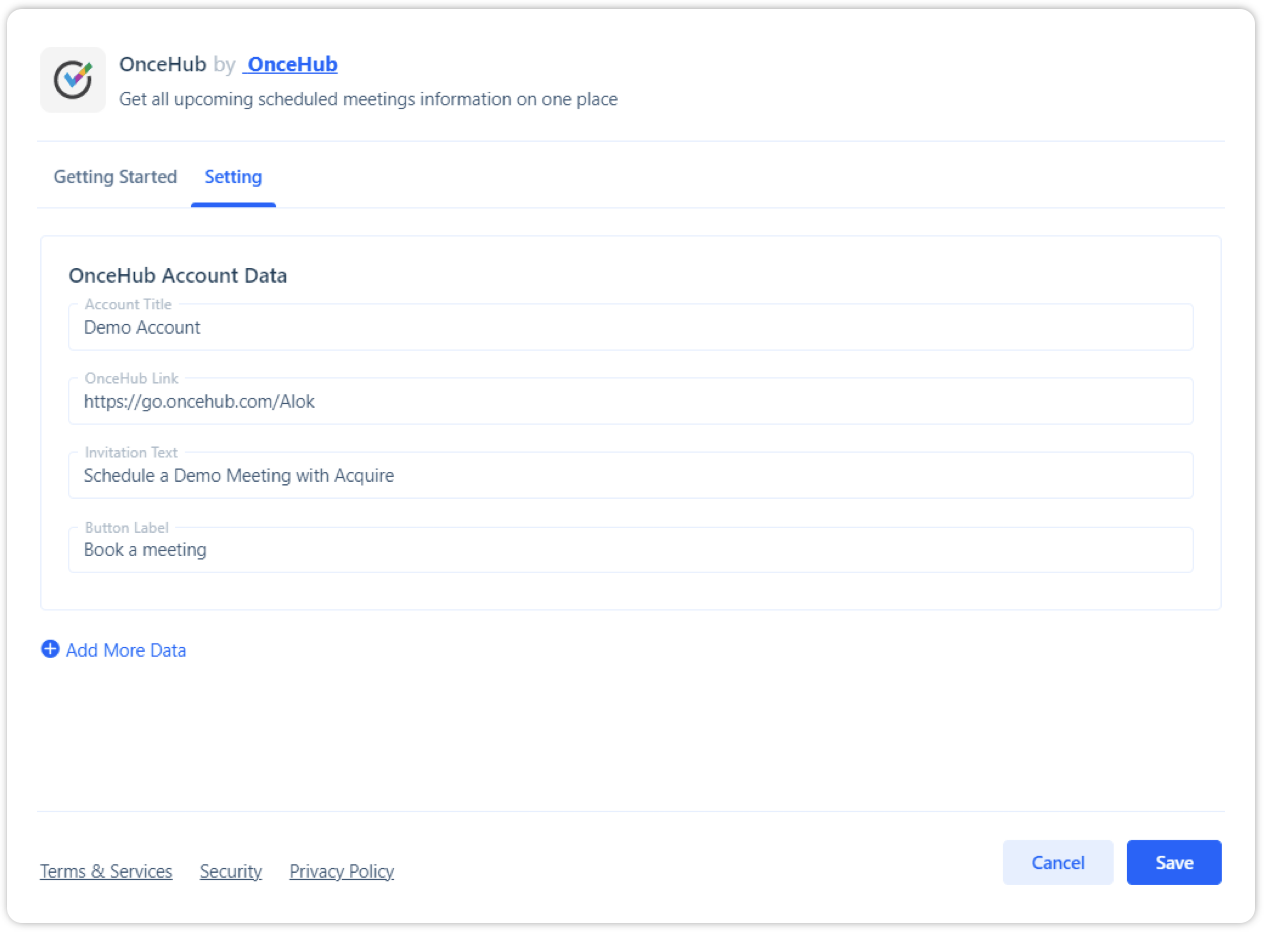
Step 3: After successfully authorizing the integration, you’ll be redirected to the Setting tab.
Step 4: In the Setting tab, write the account title and paste the OnceHub link. Optionally, change the Invitation Text and Button Label that visitors will see when they book a meeting. If you need to add more than one meeting link, click on 'Add More Data'.

Step 5: Once done, hit ‘Save’.
You’re all set to use OnceHub.
Using OnceHub During a Live Chat
Once you successfully install OnceHub, you’ll be able to share your meeting link with visitors during live chats. At this point, you may want to disable prechat forms in Settings > Messenger Setup > Chat Widget > Chat Form so a visitor won't be asked for their contact information twice.
During a conversation, to share the meeting information, click on the Apps button in the Conversation toolbar and select ‘OnceHub’.
Once the OnceHub app is shared, the visitor will be prompted to choose a meeting type.
They’ll also be able to choose a date and time according to their timezone.
After submitting their contact information, the agent will see a confirmation in the timeline. Confirmations will also be sent to the visitor and the email address associated with the OnceHub account. If you synced OnceHub to your digital calendar, your meeting will also show up there.
Using OnceHub in a Sequence Bot
Need to automate your scheduling? Build a Sequence Bot to share meeting links while the team is away from their desks.
Choose a starting method, manual or quick start, to get connect your bot with OnceHub.
Manual Start
If you want to create a new Sequence Bot to hold your OnceHub meeting logic, you can navigate to Chatbots > Sequence Bots. Click on ‘Create New Sequence’ and choose ‘Blank Sequence’ then press ‘Create’.
In a new branch, click on ‘Add another interaction’ and select ‘Add Chat Widget’.
A chat widget asset will appear on the right. Click on the ‘Choose widget’ link and select ‘OnceHub’ from the drop-down menu.
Click on ‘Save Branch’. To activate the bot using a Business Rule, go to the ‘Activate the Bot’ section below.
Quick Start
To get started quickly, go to Chatbots > Sequence Bots. Click on ‘Create New Sequence’ and choose ‘Schedule a demo’. Then press ‘Create’.
On the Demo branch, change the ‘Get a Demo’ app to ‘OnceHub’ by clicking on the ‘Choose Widget’ link and selecting ‘OnceHub’.
Click on ‘Save Branch’ and then publish the sequence.
Activate the Bot
To activate this bot, go to Settings > Workflows > Business Rules. If you want to tie this bot to a workflow you’ve already created, edit the workflow and select ‘Assign Bot’ from the action list.
To create a new rule, click on ‘New Rule’ and choose ‘Chat’ as your channel on ‘On Visit’ or ‘On New Conversation’ as your trigger (depending on your use case).
Create a new branch and choose ‘Assign Bot’. Select the sequence bot you just created from the drop-down menu.
Hit ‘Save Flow’ and set the Business Rule’s status to active.
Your bot is now ready to sign visitors up for meetings through OnceHub.
Need more information? Find out more in OnceHub’s Knowledge Base or email us at support@acquire.io.
Was this article helpful?


