Workflows
Business Rules for Chat
Reduce complexity by creating one Business Rule for all your use cases.
In this article:
- Why Use Business Rules for Chat
- Sample Business Rule for Chat
- Setting Up Business Rules for Chat
- Constructing a Workflow with Actions
- Editing or Deleting Flows and Rules
Why Use Business Rules for Chat
When visitors land on a page, you want them to interact with the widget, book a meeting with an agent, or engage with the chatbot. To accomplish that, you’ll need to capture their attention. Now, you could try a universal method, such as writing one welcome message for your entire site. However, the people visiting your support page could be very different from those checking out your pricing page.
That’s why we created Business Rules for Chat. Keep track of all your automated tasks in one place, avoid workflows that could contradict one another, and easily update from a centralized location.
Sample Business Rule for Chat
In this example, a customer created Business Rule branches for the pages on their website. The simulate page displays a message, the contact page hides the widget, and the features page uses a Conversational Bot.
Setting Up a Business Rule for Chat
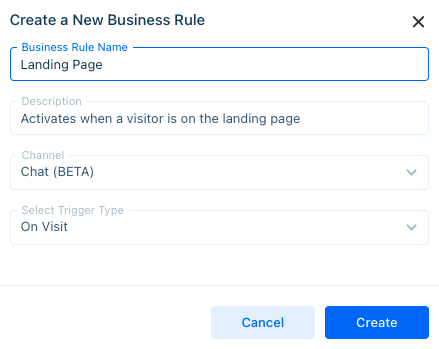
Step 1: Go to Settings > Workflows > Business Rules and click on ‘New Rule’
Step 2: A menu will appear. Choose ‘Chat (BETA)’ from the ‘Channel’ dropdown. You'll need to specify the trigger type:
- On Visit - if the visitor satisfies the condition (i.e., they visit a widget-enabled page)
- On New Chat - the visitor starts a new conversation.
Then press ‘Create’.

Step 3: After creating a Business Rule, you’ll need to choose the actions and workflows that make sense for your use case. Read more about actions in the section below.
Step 4: Construct your Business Rule. To add more actions, click on the plus sign (‘+’) at the end of each branch.
Step 5: When you have finished creating your workflow, hit ‘Save Flow’ at the bottom of the screen. You’ll also need to set your status toggle to active (green, right).
Constructing a Workflow with Actions
Craft a user story for your site by identifying ways your widget, agents, and chatbots will engage with visitors.
Keep organized by creating up to five ‘Action Groups’. Actions happen one after the other, so set the beginning action as your leftmost action. Actions are usually grouped with ‘Add a Condition’. Conditions check information about the visitor and the technologies they use. Use these to branch out into different scenarios for your visitor.
If a user lands on a support page, it’s a good idea to assign your support staff through ‘Assign a Department’. Save customers time by connecting them with the right department from the start—avoiding transfers and wait time.
In a global economy, it’s great to have agents (and widgets) who speak more than one language. ‘Add a Condition’ to check for a visitor’s country, and then ‘Add Widget Language’ and ‘Assign Agent’.
Are visitors contacting your site outside of ‘Operating Hours’? ‘Apply Chat form’ so visitors leave information and send an ‘Email Notification’ so agents can follow up the next working day. Note: to set operating hours, head to Settings > Conversation Settings > Operating Hours.
Test different bots with ‘A/B Test Groups’ and ‘Assign Bot’. Analyze path data and question reports in Chatbot Analytics.
Running a promotion? Use a ‘Popup Alert’ to let your visitors know about an upcoming sale or event.
The scenarios above only scratch the surface of what Business Rules are capable of. Accomplish complete after hours coverage by creating email and SMS Business Rules.
Editing or Deleting Flows and Rules
If you need to change the flow, click on the rule’s name, or click on the three dots (‘...’) next to the status toggle and select ‘Edit Flow’. You’ll return to the flow page where you’ll be able to edit (pencil icon), copy (pages icon), or delete (trash icon) the rule.
To edit a rule’s name or description, click on the three dots (‘...’) next to the rule’s status toggle, and select ‘Edit Rule’.
To delete a rule, click on the three dots (‘...’) next to the rule’s status toggle, and select ‘Delete’.
Have a great Business Rule idea but don’t know how to achieve it? Reach out to support@acquire.io.
Was this article helpful?


