Settings
Setting Up an Outlook Inbox
Set up an inbox in Acquire with the popular email service, Outlook. Once integrated, you’ll be able to respond to and send emails from Agent Home without having to switch between screens.
In this article:
- Setting Up an Outlook Inbox
- Connecting to Acquire
- Enabling Forwarding from Outlook
- Editing or Disabling Forwarding
- Troubleshooting
What you’ll need:
- An Outlook Account with a Custom Domain
- A custom domain from a service provider (such as GoDaddy)
Please note that this email setup may take several hours or days to complete. We suggest that you set aside plenty of time to complete this setup.
Setting Up an Outlook Inbox
If you have not set up an email inbox with a custom domain in Outlook, you will need to follow the steps below.
Sign up for an Outlook account. During this process, you will need to use the domain name for your email account.
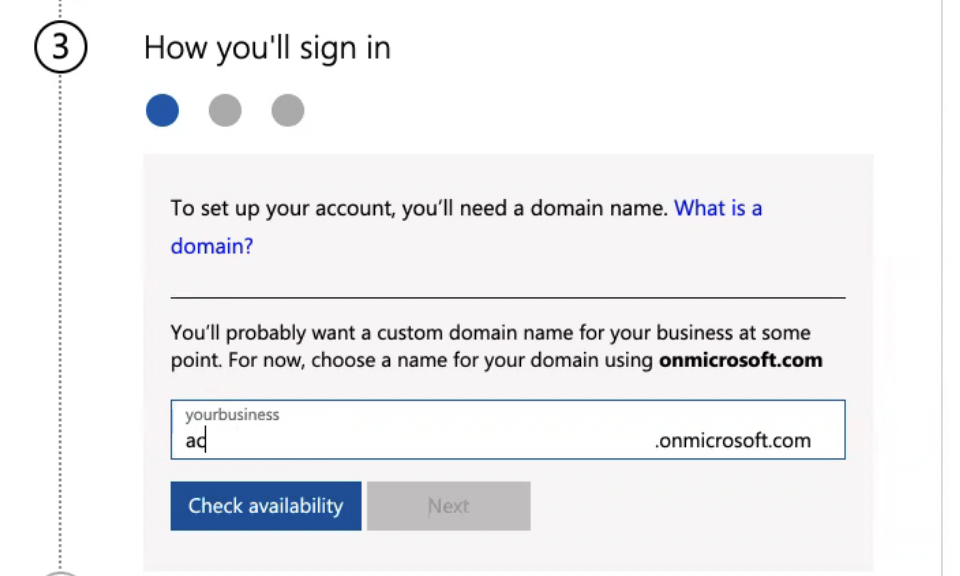
Outlook will have you write a domain and attach onmicrosoft to the end of it. You will be able to change this later, so for now, write the business name you intend to use.
Step 1: Connecting Your Domain
After you’ve signed up and verified your account, you’ll be brought to the set up page. Select ‘Set up email with a custom domain’ or ‘Finish setting up email’ to connect your domain.
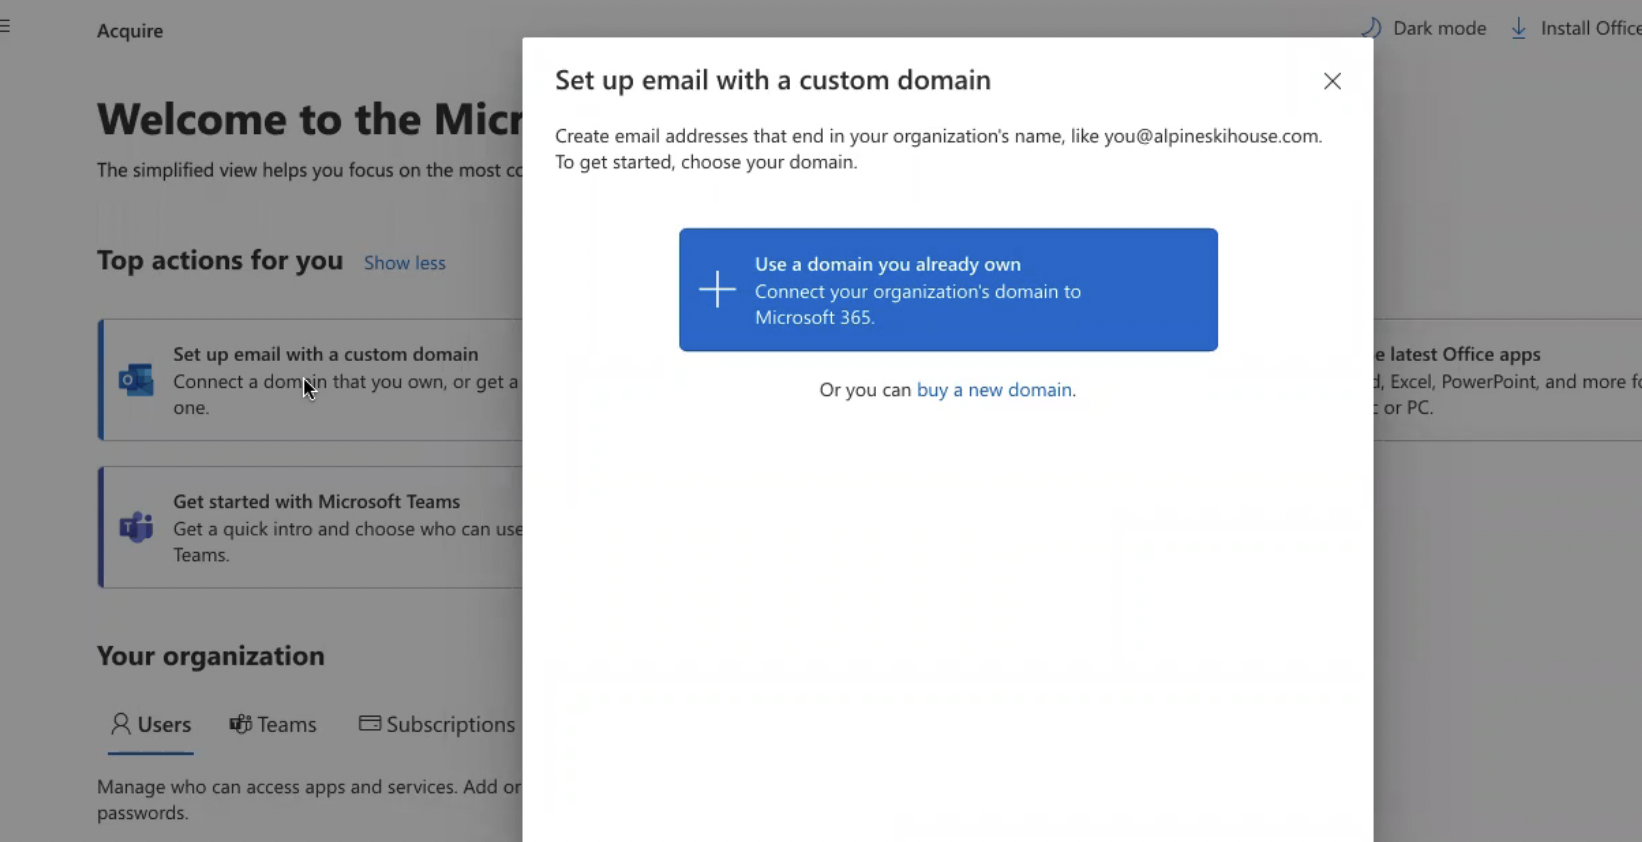
At this step, you’ll connect to your domain, such as GoDaddy, DigitalOcean, or Gandi to name a few.
If you do not have a domain, you’ll need to purchase one from Microsoft or another service.
If you have a domain, click on ‘Use a domain you already own’. Click through the set up and add your custom domain.
In this example, we’ll be connecting a GoDaddy domain.
Enter the name of your domain.
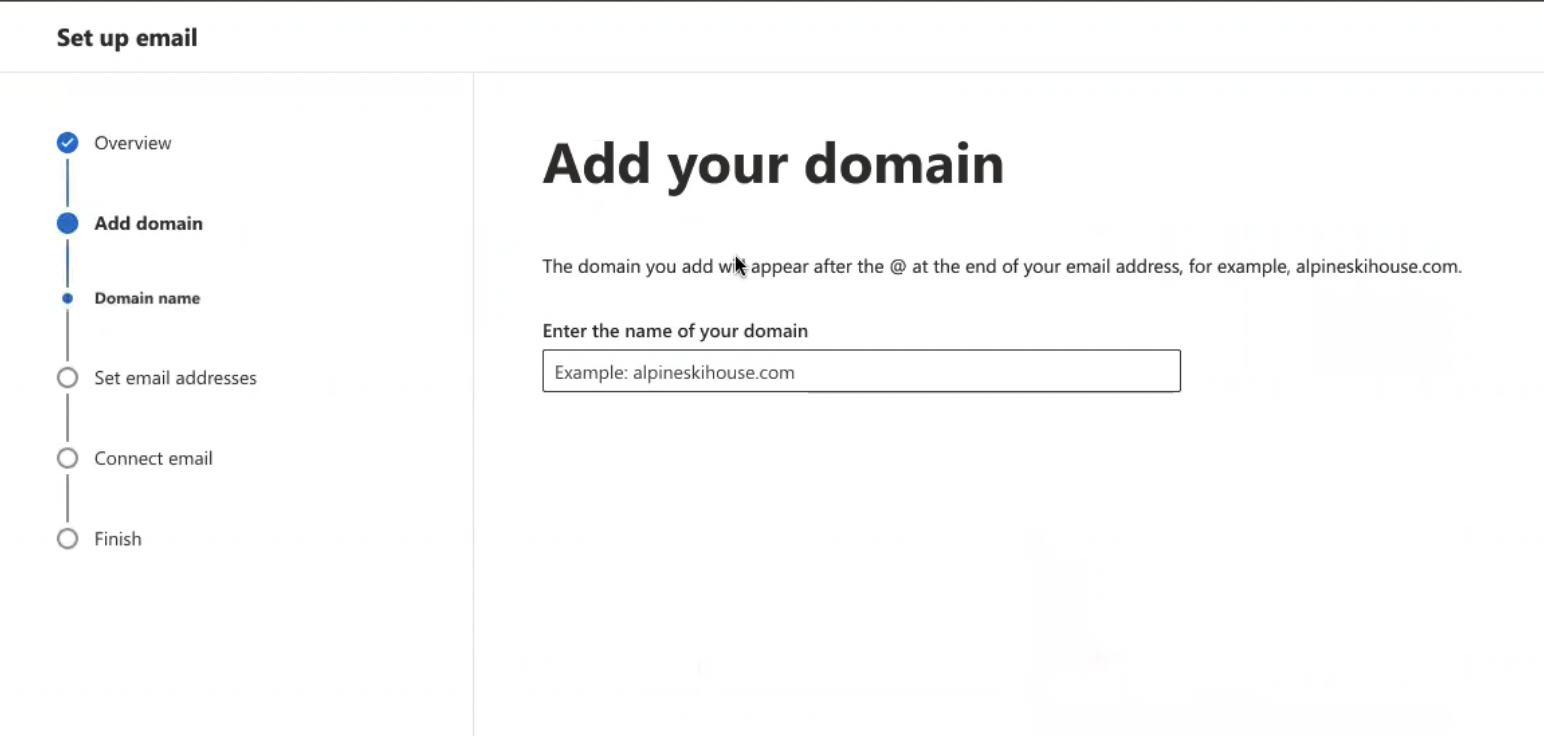
Then press ‘Verify’.
You will be asked to connect with GoDaddy. Press ‘Connect’.
After a successful connection, you will be asked to change your email address (your GoDaddy domain will now be the latter half of your email address). Take note of this new email address as you will be asked to sign back in in the next step. Then click on ‘Update and sign out.’
Note: Your old ominsoft account will be converted into an alias account.
After this step, you will be signed out of Microsoft 365 Admin Center. Microsoft will sign you out and suggest you close all your browser windows.
Sign back in with your new email address. You may be directed to your Microsoft Office 365 Dashboard. Go back to your Microsoft 365 Admin Center (you may need to log in). You should see your username, along with your sign at the bottom of the page.
Step 2: Adding Other Email Addresses to Your New Domain
Before finishing the DNS record setup, be sure to follow this step:
Important: Before adding these DNS records, make sure you've already set up [yourdomain].com email addresses in Microsoft 365 for all existing users who still need one, or they won't be able to send and receive email.
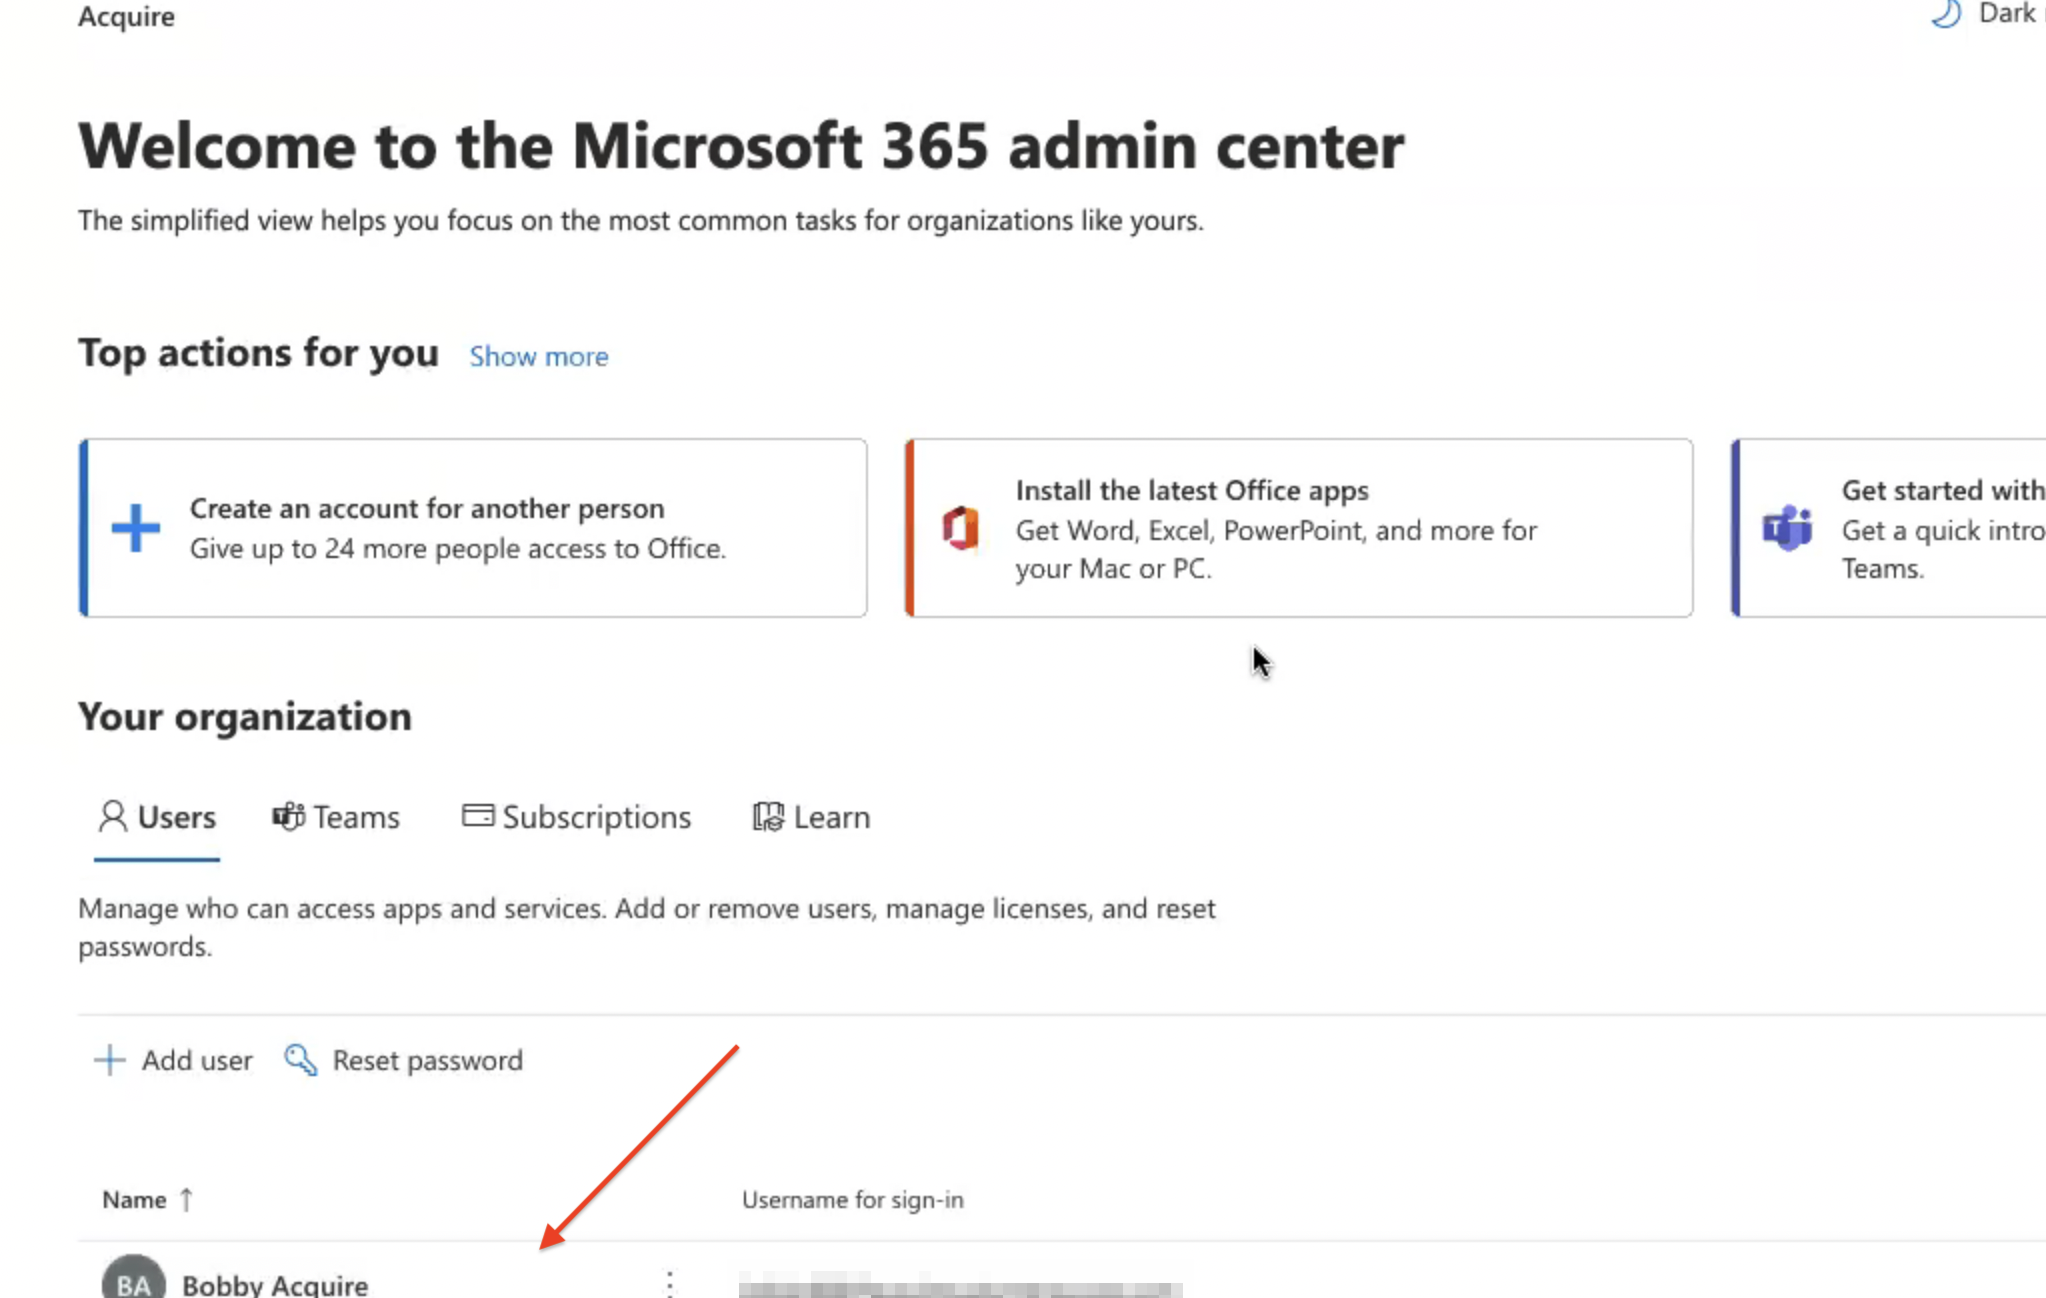
If you have other email addresses associated with the news domain, you must add them to that new domain before continuing with DNS set up. To do so, click on ‘Create an account for another person’.

You will be able to set up as many accounts as your Microsoft account permits.
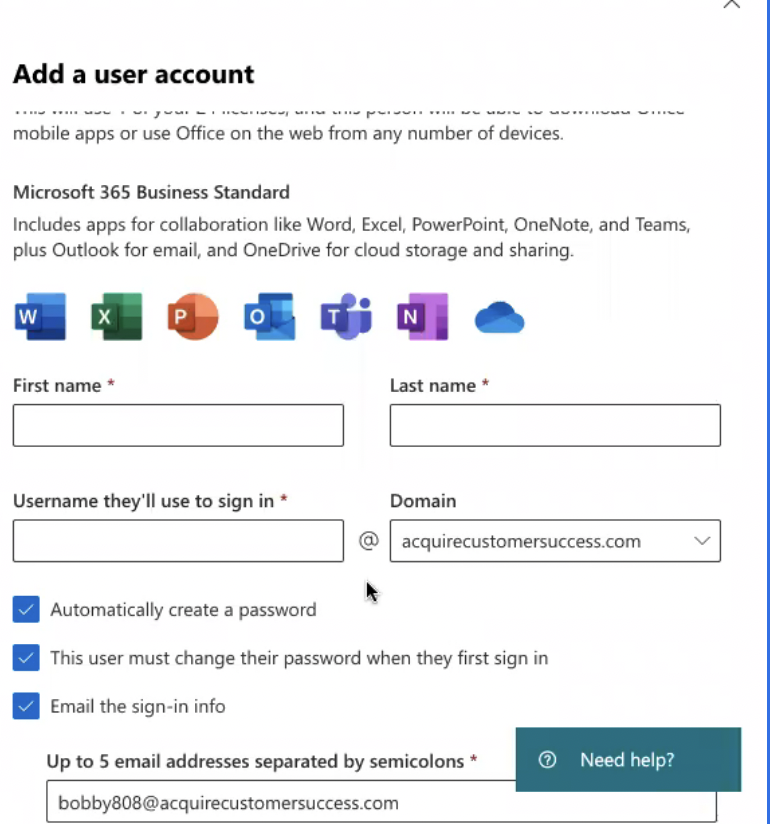
Credentials will be emailed to the specified user.
Verify that the new users were added to the account from the 'Your organization' section of the admin center page.
Important: Before adding these DNS records, make sure you've already set up [yourdomain].com email addresses in Microsoft 365 for all existing users who still need one, or they won't be able to send and receive email.
Step 3: Setting Up Your DNS Records
You will now need to add DNS records to your service domain provider.
Click on ‘Show more’ next to 'Top actions for you'.
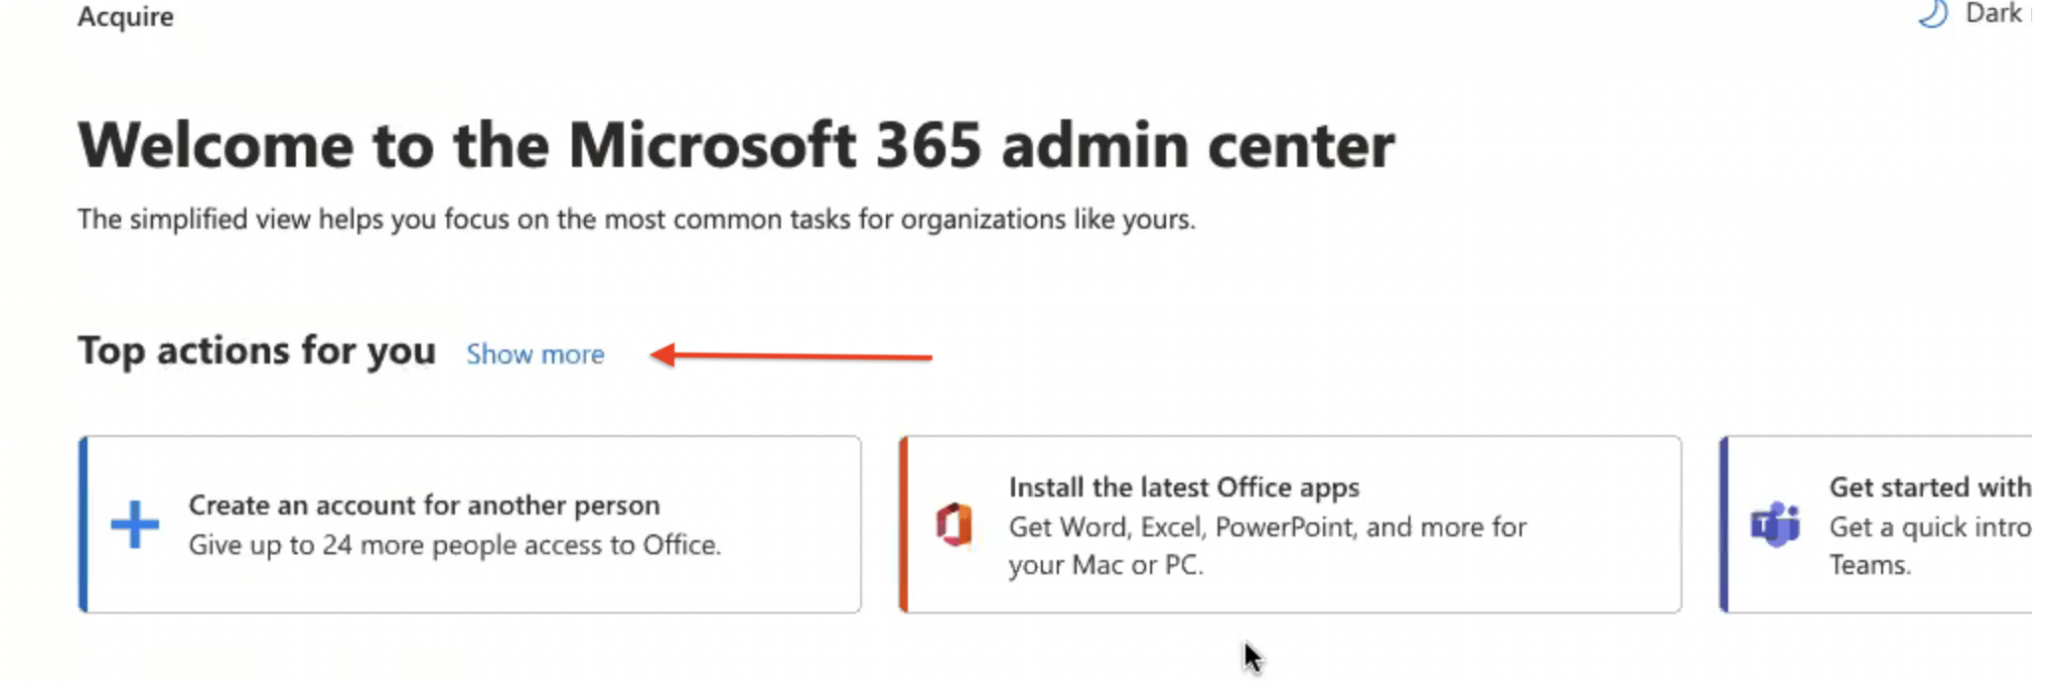
This will open up more options. Click on ‘Finish setting up email’.
Some steps may already be completed.
The instructions may prompts you to sign in to verify your GoDaddy account, or add the TXT record manually. Choose the option that best fits your use case.
Choose the domain you’ve set up in the previous steps and press ‘Continue’.
You will be asked to connect your domain and email. Click on ‘More options’.
Choose how you would like to connect your domain.
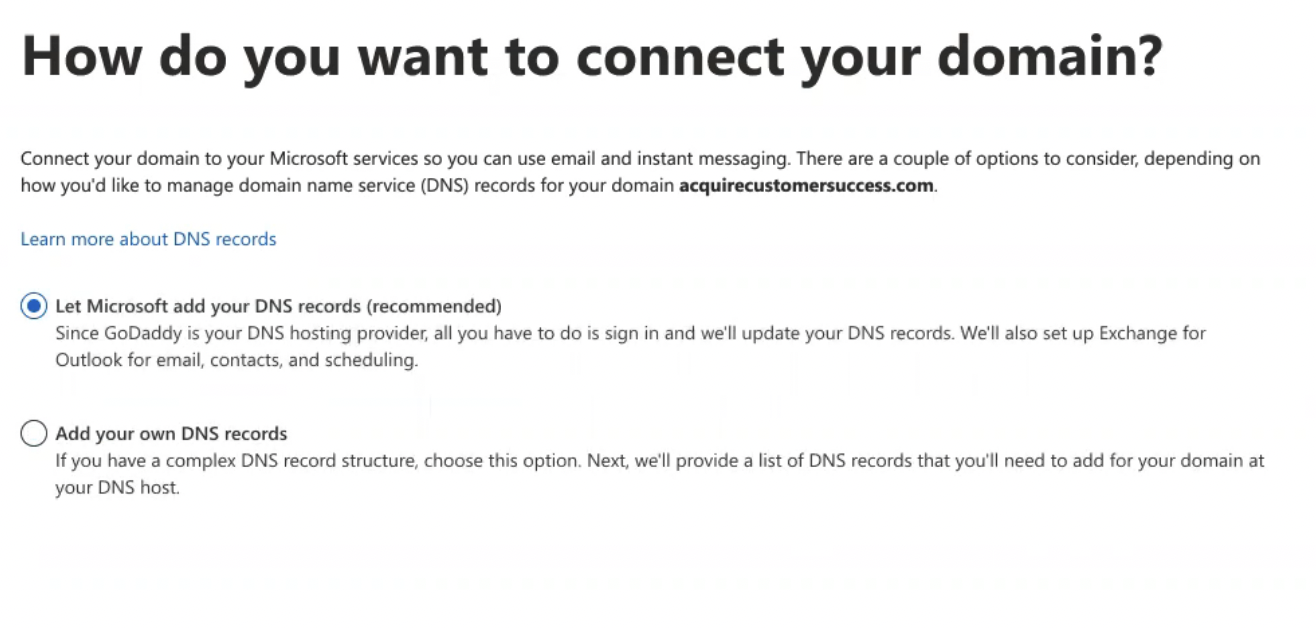
If you choose ‘Let Microsoft add your DNS records’ you will be asked to sign in with GoDaddy.
If you choose ‘Add your own DNS records’, you will be given records to add to GoDaddy manually.
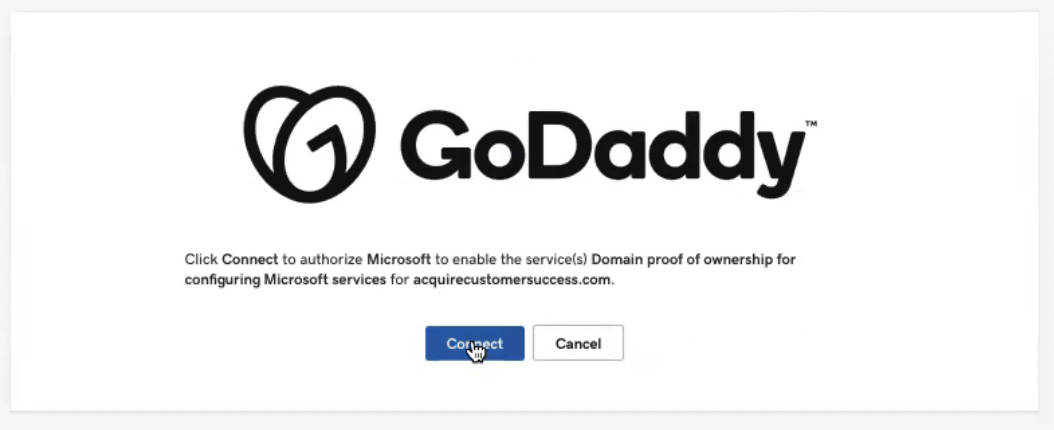
If you choose the first option, you will be prompted to ‘Connect’ your domain provider. Click ‘Connect’.
If you choose the second option, copy the TXT records to your domain provider.
After adding, you should get a message in Microsoft 364 Admin Center letting you know ‘You’re all set to use email’. You may now connect the inbox to Acquire.
Step 4: Connecting to Acquire
Now that you’ve set up your Outlook inbox, go to Acquire to connect the new inbox. Navigate to Settings > Installation & Setup > Email Setup.
Click on ‘Connect Inbox’ and fill out the information in the following form:
- Inbox name - give the inbox a unique name.
- Select department - choose the department(s) that will use the inbox. Note: If you will be testing this inbox out, make sure you are in the same department that you’re assigning the inbox to.
- Inbox Email Id - Your Outlook email address.
- Undo Time Settings - Sets a delay for sent mail in Acquire.
- Track Sent Email - Allows you to track sent emails (you must have the appropriate SMTP to do so).
- Threading Mode - If you’re conversing with a visitor via chat and email, for example, create a separate thread for each channel.
- Auto BCC - Send a copy of the email to the specified recipient. Optional.
- Select SMTP - Specify an SMTP server. Optional, but recommended.
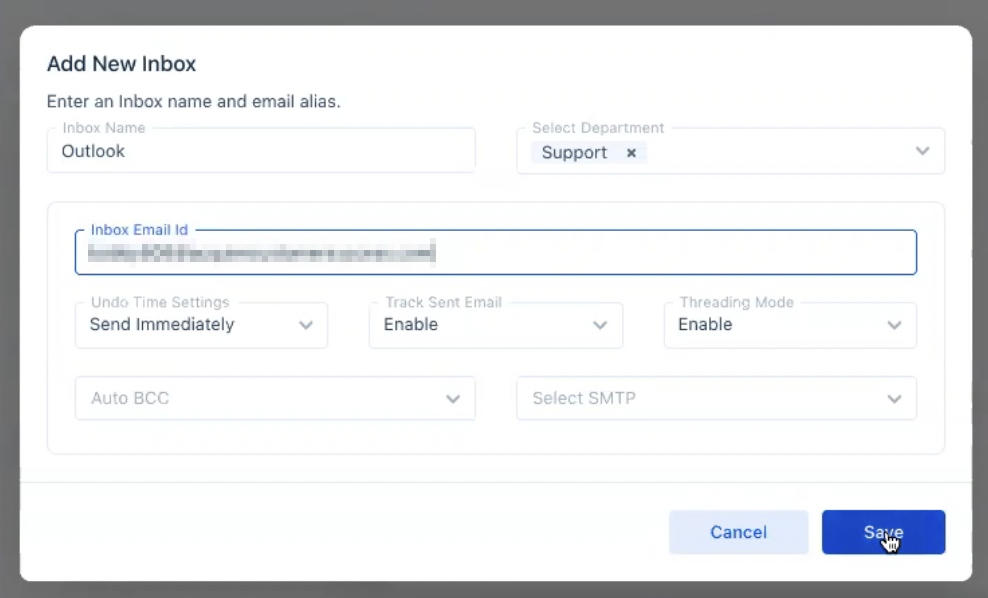
Once you’ve entered the information, press ‘Save’.
Once saved, a forwarding address will appear. Copy the forwarding address and store it in a safe place. You will use this to forward emails from Outlook into Acquire.

Then press ‘Send Verification Email’.
If everything is hooked up correctly, you’ll see the Acquire email in your Outlook inbox. Remember to check your Junk folder.
You’ve now set up email from Acquire’s end. The next step is to enable forwarding through Outlook.
Step 5: Enable Forwarding from Outlook
We will now need to set up forwarding to receive emails from our Outlook inbox into Acquire.
Log in to your Outlook inbox. You should see an email asking you to validate Acquire forwarding. Open it and follow the directions in the email.
Then, while in Outlook, click on Settings > View all Outlook Settings > Forwarding. Check the ‘Enable forwarding’ box and paste the forwarding address you received from Acquire.
Be sure to check the box ‘Keep a copy of forwarded messages’. That way, you’ll be able to save a copy of emails in your Outlook inbox.
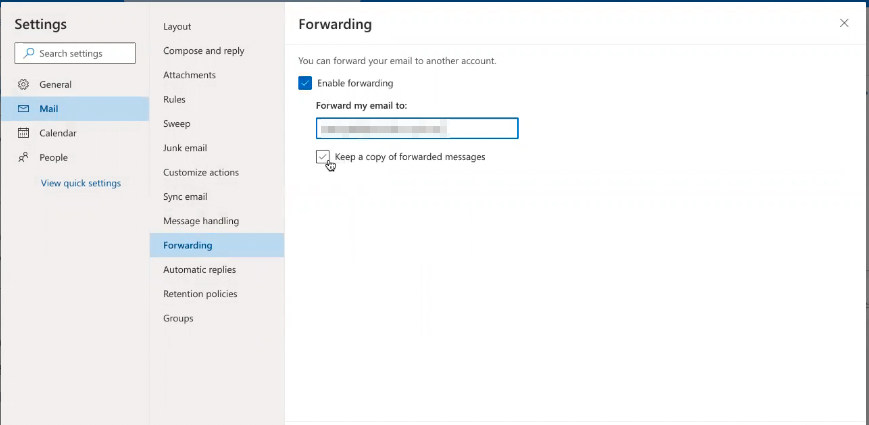
Set up forwarding in Outlook.
If you receive an error at this step, refer to the Troubleshooting guide below.
Testing Your Email
At this point, it’s a good idea to test your email to ensure everything is working correctly. To do so, send an email from a non-Outlook inbox to the Outlook inbox. If everything is working correctly, you should receive emails within Acquire.
If you don’t receive emails in Acquire, or receive an email informing you that your email couldn’t be sent, refer to our Troubleshooting guide below.
Editing or Disabling Forwarding
Need to edit your inbox? To do so, go to Acquire’s Settings > Installation and Setup > Email Setup. Click on the three dots next to the inbox and select ‘Edit’.
From this menu, you may also select ‘Delete’ to delete the inbox. We’ve put together a checklist and guide on some things to keep in mind when deleting an inbox.
Troubleshooting
We’ve put together a list of the common issues you may experience when connecting an Outlook inbox to Acquire.
Remote Server Error
If during testing, you may receive an error message that looks like this: Remote Server returned '550 5.7.520 Access denied, Your organization does not allow external forwarding. Please contact your administrator for further assistance. AS(7555)'
To resolve this issue, refer to the Microsoft Help Doc.
DKIM Not Validated
During setup in Acquire, you may see a label in Settings > Installation and Setup > Email Setup informing you that your DKIM information is missing.
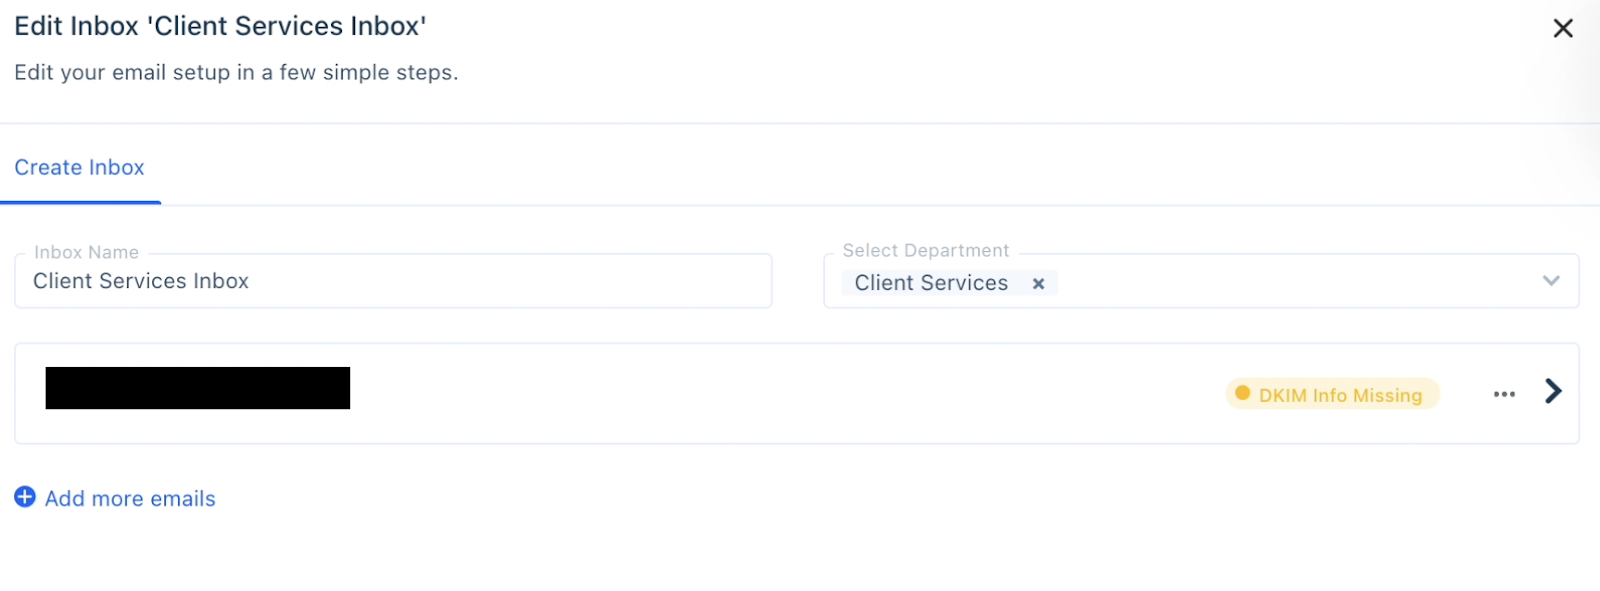
DKIM Info Missing in the email setup menu.
This means that you may need to manually provide the records to your domain provider.
Our DKIM Error guide covers how to resolve this error for three common service providers.
Provider Rejecting Email
When testing your Acquire forwarding capabilities you may receive an error in the form of an email message. This email will tell you that the delivery has failed because the recipient’s email provider rejected it.
Microsoft disables external forwarding by default. To avoid this error, make sure you’re logged in as an admin, and go to your anti-spam page in Microsoft 365 Defender portal (you may need to log in). Go to Policies & Rules > Threat Policies > Anti-Spam Policies. Click on ‘Anti-Spam outbound policy (Default)’ and scroll down to ‘Edit protection settings’. Turn on automatic forwarding rules by selecting ‘On - Forwarding is enabled’ from the Forwarding rules drop-down menu.
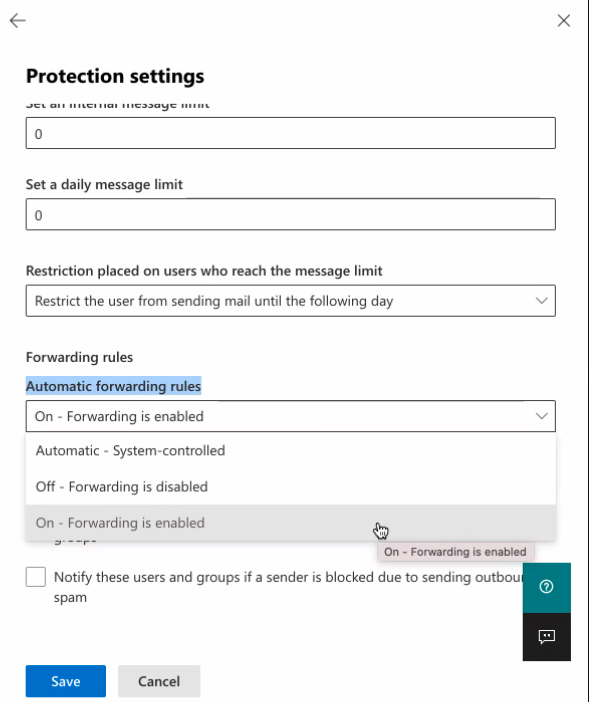
Then click on ‘Save’. If you recently set up email addresses, this process could take 12 hours to complete. If the error persists after 24 hours, contact Microsoft support.
Microsoft also allows you to use organization customization to resolve this issue.
Having trouble? Reach out to support@acquire.io.
Was this article helpful?


