Settings
Setting Up Email
By setting up inboxes in Acquire, you’ll be able to read and respond to emails alongside the rest of your multichannel communication. Route emails to the right team or operator, who then can respond using their personal email right from the dashboard.
In this article:
- Creating an Inbox
- Connecting Email Aliases
- Additional Settings
Step 1: Creating an Inbox
Navigate to Settings > Installation and Setup > Email Setup. Click on ‘Add New Inbox’.
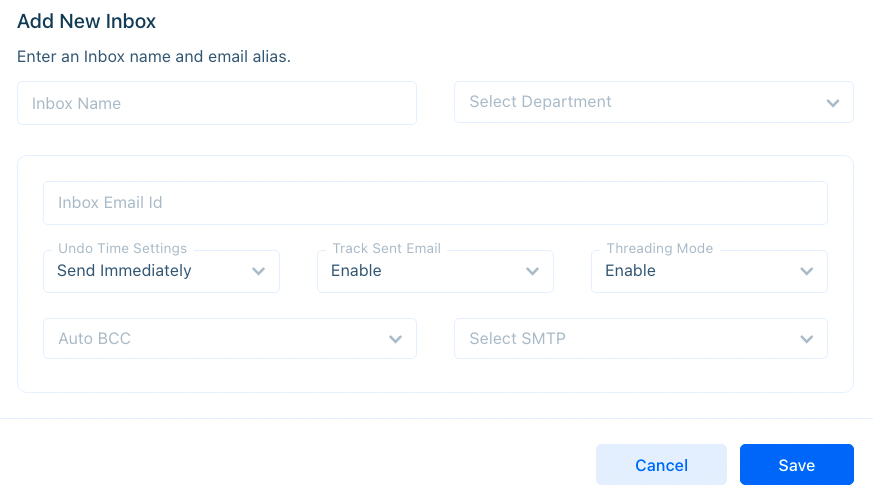
Name your inbox and select the department(s) associated with the inbox. Only agents that belong to those departments will be able to view the emails for those inboxes. Then, click on 'Other Email' and press 'Next'.
Inbox Name - Name the inbox something descriptive that your entire team will understand. Required.
Select Department - Choose the departments that will see emails from this address. Select all of the departments if you'd like all departments to see the emails. Be sure to select a department you belong to if you will be testing out the email integration. You can always change these settings later. Required.
Inbox Email Id - The email address you wish to connect to. Required.
Undo Time Settings - Automatically delay the email being sent for up to five minutes. Optional.
Track Sent Mail - Indicate if you'd like to track the mails to determine sent and open rates (see more in email analytics). Optional.
Threading Mode - Enable this option to keep all emails within a thread (recommended). Optional.
Auto BCC - Automatically include an addressee to send a copy to. Optional.
Select SMTP - Choose an SMTP service for these emails. Optional.

Click ‘Save’ to complete this step.
Step 2: Connecting the Email Alias to Acquire
If you've connected a Gmail account, go to Step 3. If you've connected another account, or Gmail alias, keep reading.
After clicking ‘Create’, a new pop-up will appear with your custom forwarding address. Copy the address and open your email client settings.
In your email client, go to your forwarding rules. Paste the address on your clipboard and add any additional settings such as filters for forwarding. Save your changes and return to Acquire.
In Acquire, click on ‘Send Verification Email’ and you’ll receive an email with a verification link. Click the link which will take you back into Acquire to complete the setup. You’ll notice that the email address is now blue, reflecting that it’s been verified.
Step 3: Customize Additional Settings
After you have connected an email address to Acquire it will appear in your inbox list. Open additional settings by clicking the three dots under Action and click ‘Edit’.
To add more emails to the inbox, view the domain details, and modify additional settings, click on the three dots (‘...’) next to the inbox. Expand the verified email settings by clicking the caret ‘>’. Use the drop down menus to add ‘Undo Time Settings’, enable sent email tracking, and enable conversation threading. Threading will keep emails and their replies in the same conversation rather than creating a new case for each email. Please note: If you are planning to use Gmail or Other SMTP, then you can not track sent emails. To enable Track Sent Emails, please change the SMTP provider to Sendgrid or Acquire.
You may also add Auto BCC to other emails like a quality assurance team or select a custom SMTP server. It's usually a good idea to connect your organization's server when sending and receiving emails.
To view domain details (Return Path, DKIM), click the three dots (‘...’) next to Email Verified then click Channel Info.
Was this article helpful?


