Integrations
Shopify
We're taking a deeper look at some of our integrations, including this one. In the meantime, some of the functionality described here may not work as expected. Thank you for your patience.
Connect your Shopify store and manage orders from the Acquire Dashboard. Assist visitors with their cart, order status, and contact information during a live chat or cobrowse session. After installing, you’ll be able to:
- Manage and check order status
- Create orders from the contact profile
- View and manage order details
Please note that you will not be able to process credit card details from the Acquire platform. You may continue to process payments through Shopify’s service providers.
In this article:
- Before Getting Started: Creating a Custom Shopify App
- Installing Shopify in Acquire
- Using Shopify with Acquire
- Ways to Leverage Your Online Store
- Including Shopify Details in a Chatbot Reply
Before Getting Started: Creating a Custom Shopify App
Before using this integration, you’ll need to create a custom Shopify app. Log in to Shopify Partners. Go to Apps > All Apps > and click ‘Create App’.
Choose the “Custom App” tab for the type of app you are building.
Enter the following information:
- Name the app
- In App URL, paste: https://acquire-apps.acquire.io/app/callback/shopify
- In Allowed Redirection URLs, paste: https://acquire-apps.acquire.io/app/callback/shopify
Then press ‘Create App.’
From the custom app page, locate the Merchant Install Link section and generate the link.
From the API keys section, copy the API Key and API secret onto a document for later.
Installing Shopify in Acquire
In Acquire, locate the Shopify app in the App Store, and click on ‘Install’ and authorize the integration. Enter your store URL and click ‘Save’.
You’ll be routed to Shopify where you'll install Acquire. Click ‘Install unlisted app’ to complete the integration. In the Settings tab, paste:
- Your Store URL
- API key you copied from Shopify
- API Secret your compiled from Shopify
- Installation URL, which is the Merchant Install Link you copied from Shopify
Once you’ve entered the information, you’ll be directed to authorize the integration. You may need to sign in to your Shopify account to complete the process. Once the integration is successful, you’ll be able to display the widget automatically on your Shopify page.
In the Settings tab, be sure that ‘Add Widget on your Store’ and ‘Store Events’ are set to active (right, green).
You’ll need both these toggles to fully use the integration.
Check that the widget is now visible in your Shopify store.
Note: If you enable the chat widget and you still do not see the integration, whitelist your store URL in Settings > Security > Login Settings > Whitelisted Domains.
Using Shopify with Acquire
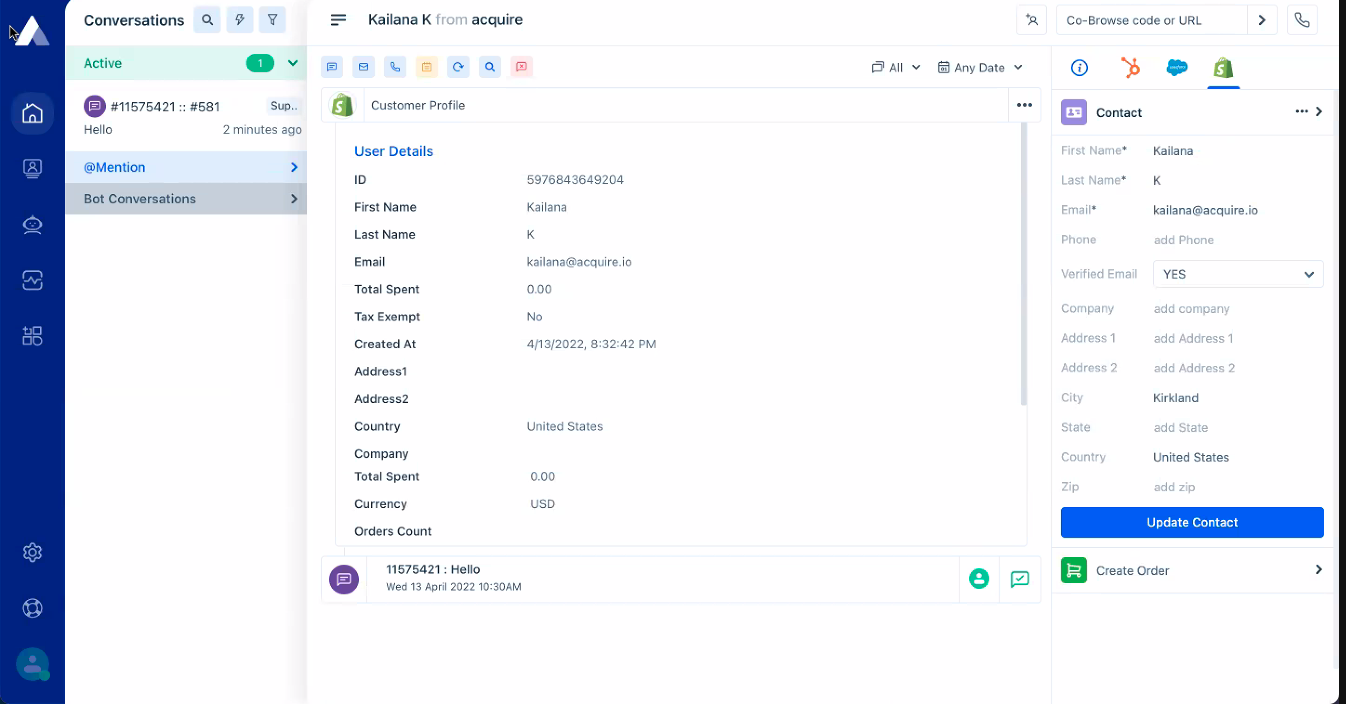
Once Shopify is installed, visitors may chat with you through the widget. Once a visitor starts a chat, you’ll be able to see if they’ve paid for items through the Shopify tab of their visitor profile. You may also create and update orders for them through this tab.
If you need to update an order from Shopify, you’ll be able to see those changes in Acquire as well.

Ways to Leverage Your Online Store
This integration allows you to provide a personalized experience to visitors and customers as they interact with your store. In addition to merging your Shopify information with contact profiles, you can:
- Cobrowse with visitors to highlight new items or help them complete an order.
- Issue order updates right from Acquire.
- Live chat or use video to update visitors to create a bespoke shopping experience.
Removing Shopify
To remove the Shopify integration, go to the App Store, click on the three dots ('...') on the Shopify card, and press 'Uninstall'.
Create a bespoke shopping experience with Shopify and Acquire. Having trouble? Reach out to us at support@acquire.io.
Was this article helpful?


