Chatbots
Webhooks for Chatbots
Customize the flow of your bot conversations with webhooks. Acquire’s webhooks are universal, meaning that agents and bots may share dynamic data. This tutorial will walk you through setting up a webhook and connecting it to a chatbot.
In this article:
- Creating a Webhook
- Connecting a Webhook to a Chatbot
- Types of Webhooks
- Special Webhooks
- Setting a Fallback Response
- Webhook Examples
This article covers concepts such as JSON, webhooks, Custom Attributes, and Chatbots. It’s recommended for advanced users.
Creating a Webhook in Acquire
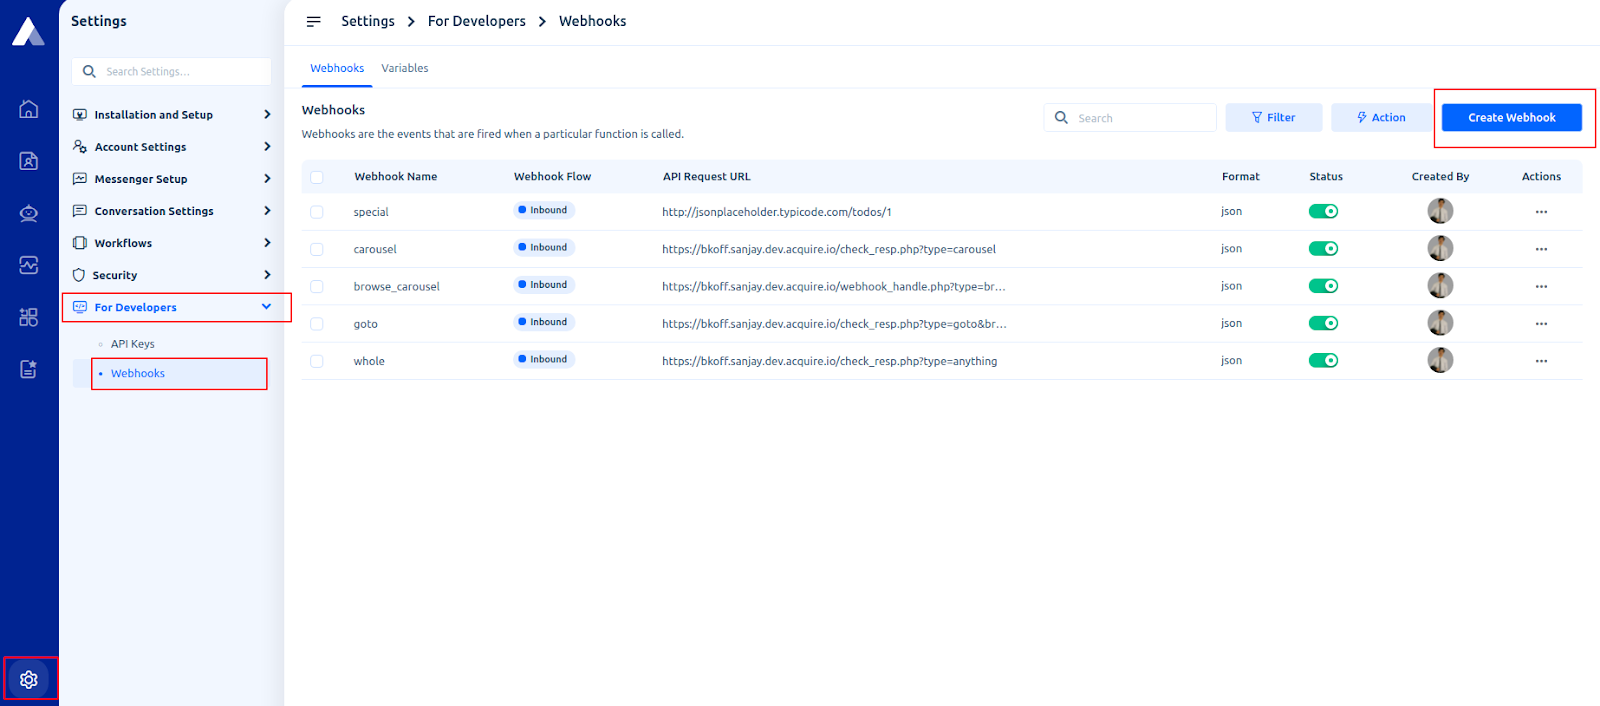
Once you’ve created a webhook on a testing site (such as webhook.site or pipedream) or in your system, you’ll need to create a reference to it in Acquire. To create a new webhook, go to Settings > For Developers > Webhooks and click on the ‘Create Webhook’ button.
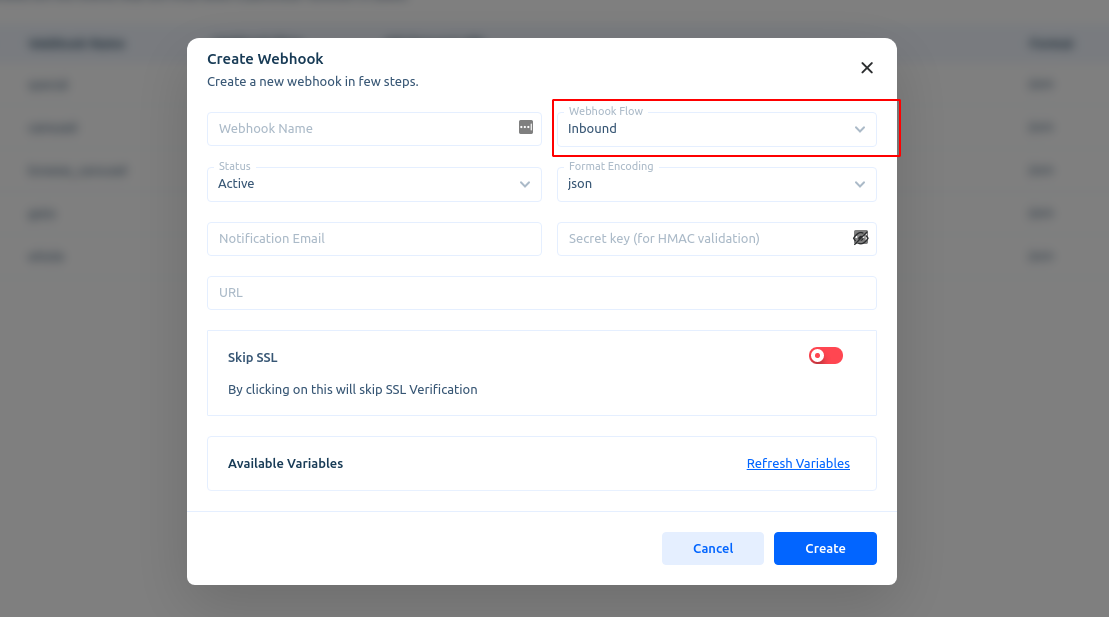
Provide a new name for your webhook in the ‘Webhook Name’ field. Then, select Inbound in the ‘Webhook Flow’ section. Learn more about the different types of webhooks below:
- Inbound - collects information from outside sources to be displayed within Acquire. Works with chatbots.
- Outbound - collects information from within Acquire to be displayed in outside sources.
Next, set your format, status, and security preferences as well as an email address. Should your webhook fail, a notification will be sent to the email address provided.
Paste the webhook URL. Once pasted, you’ll see a list of the available variables.
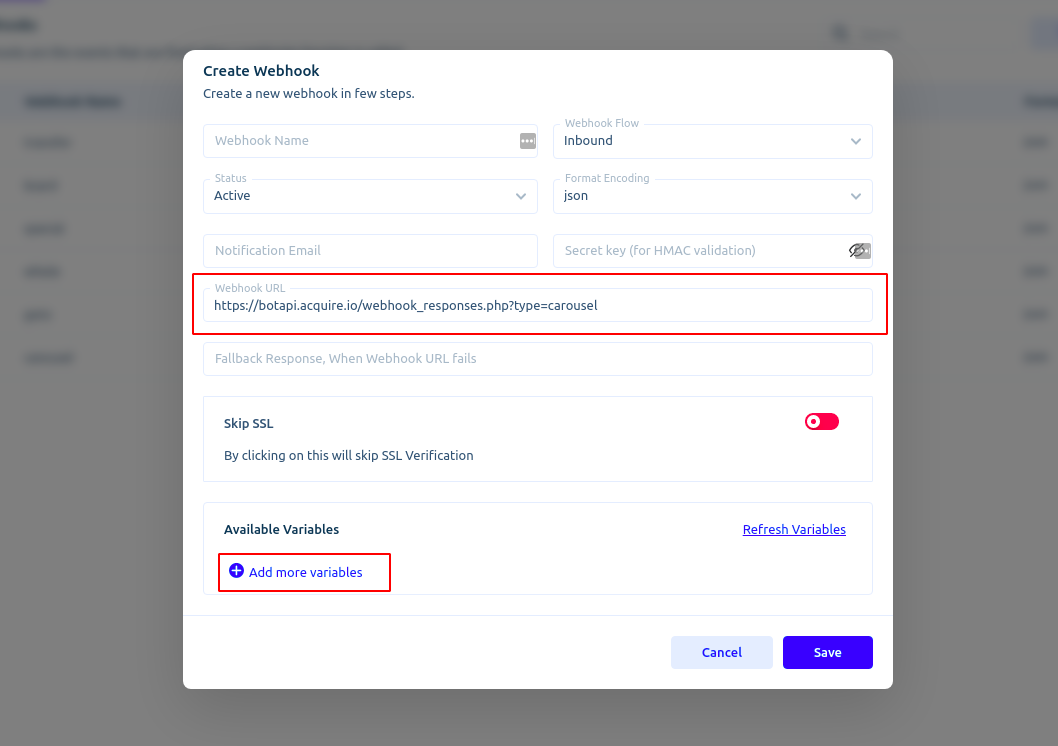
The “Available Variables” section will list variables if the system identifies the variables from the URL response, if it does not list any variables, you may add your own variables.
To add custom variable names, click on the ‘Add more variables’ option.
(You'll need to do this when using more than one special webhook).
Then, press on ‘Create’.
Your inbound webhook is now ready!
Connecting a Webhook to a Chatbot
All webhooks work with Sequence Bots. A few work with the Conversational Bot. We recommend using webhooks in Sequence Bots to create a predictable experience.
Sequence Bot
To use a webhook in a Sequence Bot, go to Chatbots > Sequence Bot. Create a new sequence or edit an existing one.
In the bot flow page, select a node to edit it and then click on the webhooks button in the toolbar. A drop-down menu of your webhook variables will appear.
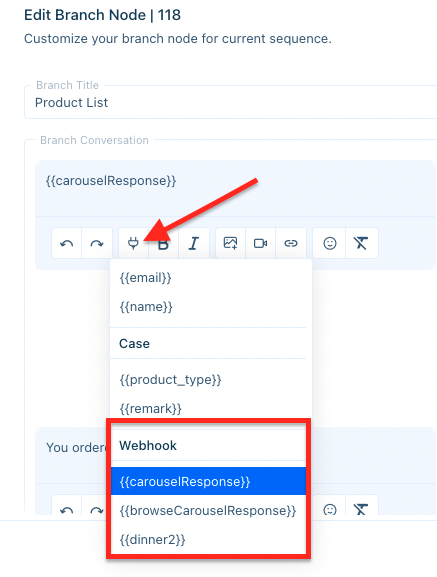
Finally, press ‘Save Branch’. Your Sequence Bot will display the webhook information when it is triggered.
Note: Webhooks may not behave properly if you use them in the initial message and turn the bot greeting ‘on’. We recommend disabling Bot Greetings when using webhooks and using them after the initial message.
To turn off greetings for all Sequence Bots, go to Chatbots > Configuration and disable ‘Allow Greeting in Widget Pop-up’.
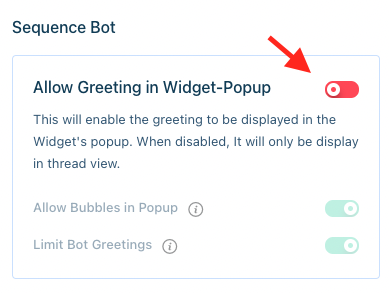
To turn off the greeting for a specific bot, look in the top-right corner (next to the publishing toggle) of the workflow and switch the greeting to off.

Conversational Bot
To have a Conversational Bot display a webhook response, go to your Conversational Bot group in Chatbots > Conversational Bot. Create a new question by clicking on the ‘Add New Question’ button, or edit an existing one.
Write your question (and variations) in the ‘Add Question’ field.
In the Answer type section, select ‘Formatted Answer’ and then click on the webhook button in the toolbar. Scroll down to the ‘Webhook’ list and select the webhook.
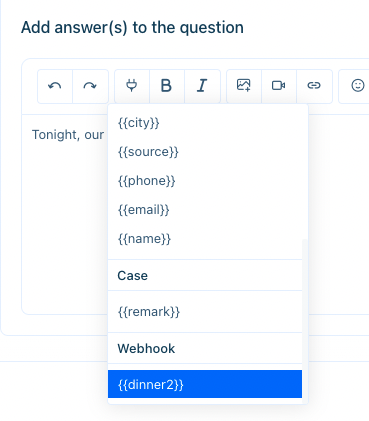
Your Conversational Bot will now give a dynamic response to customers.
Types of Webhooks
Webhooks are categorized into two groups: string-based and special webhooks.
String
Works with: Conversational Bot and Sequence Bot
String webhooks are text-based responses that may be combined with text already in your bot. Format your webhook response in a key-value pair. For example:
{"account_balance":"$36,000"}
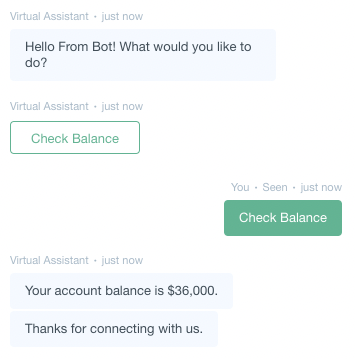
In the Sequence Bot example below, the sentence ‘Your Account Balance is {{account_balance}}’ is used to show a customer what their bank account balance is.
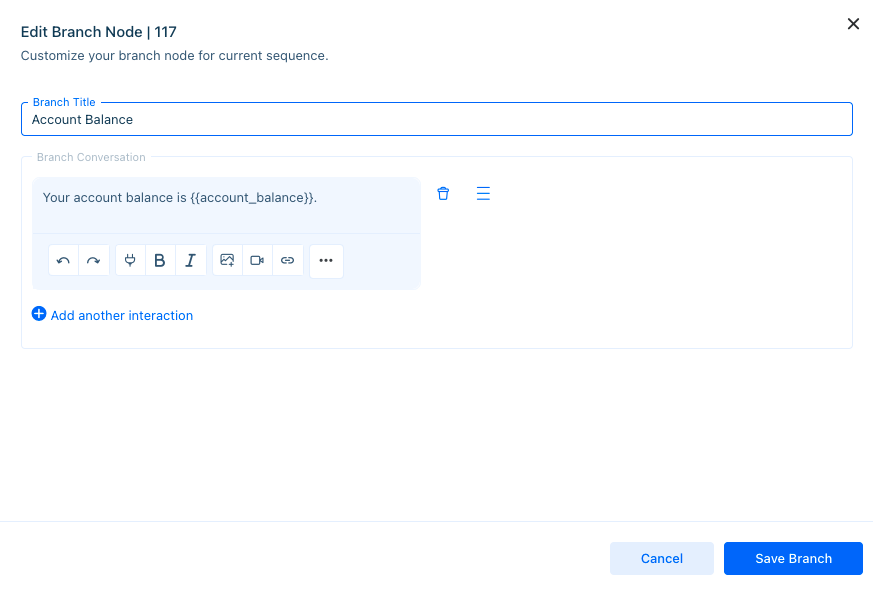
When a customer reaches the ‘Account Balance’ part of the sequence, the webhook displays their account information.
Special Webhooks
A special webhook uses a reserved phrase and performs a specific function. To use more than one special webhook, you should customize the webhook’s variable name in Settings > For Developers > Webhooks. There are a number of special webhooks:
replaceWholeResponse -replaces a message.List -show a list.carouselResponse -displays a card carousel.browseCarouselResponse -displays a card carousel with redirect links.gotoBranch -routes to a branch.chatRouteTo -routes to a department or agent.
When using special webhooks with text (strings) in the same reply, the text will disappear. For best results, use special webhooks independently, and do not include any texts (string) in the same field.
A good example would be:
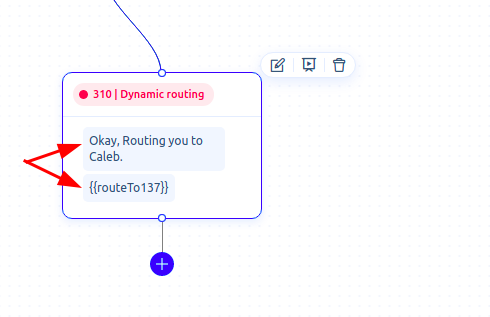
In this example, the text and webhook are in their own bot replies.
A bad example would be:
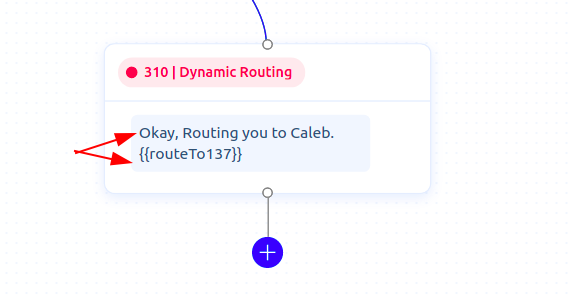
In this example, the text and webhook are in the same bot reply.
To use text with a special webhook, create a separate bot reply for the webhook.
Replace Whole Response
Works with: Conversational Bot and Sequence Bot
This webhook replaces the whole response. The JSON object must contain the key "replaceWholeResponse". This webhook is useful when you need to show fallback responses or error messages. Format your webhook in a key-value pair:
{{"replaceWholeResponse":"Sorry, your account balance is `zero`, please deposit some money in it. Thanks."}}
In the following example, the original text ‘Your account balance is {{replaceWholeResponse}}’ will be replaced with the webhook response.
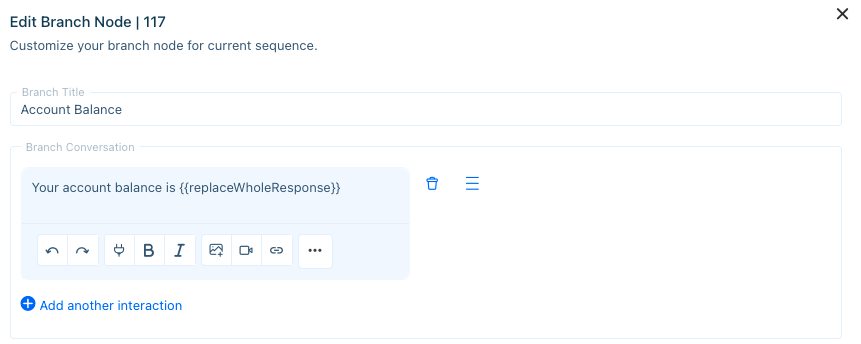
The customer will only see the webhook response.

List Based
List-based webhooks allow you to provide multiple choice responses to your visitors. They may be implemented through bot replies (as a text-based list), carousels, and browse-carousels.
Text-Based Lists
Works with: Sequence Bot
Allow a visitor to choose from an option by implementing a text-based list using a webhook. Format the list-based list with the following key-value pair:
{"listResponse":"<Stringify Carousel JSON>”}
Make sure you use the key ‘listResponse’. Modify the JSON as per your use case. For example, a JSON object may be formatted in the following way:
{
"listResponse" : "{"title":"Order Ids","description":"Please choose your Order Id from below list.","items":["10001","10002","10003","10004"]}"
}
Lists allow a visitor to quickly choose from a variety of options.
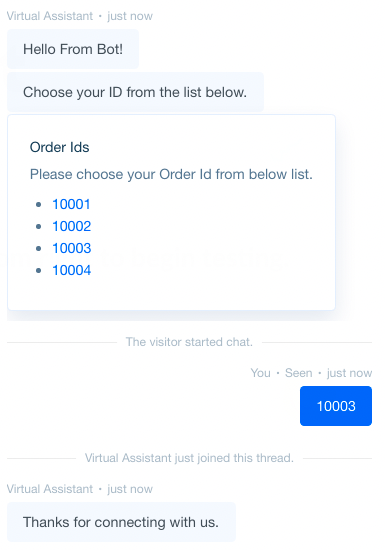
When using a list webhook within a Sequence Bot, write the list webhook in its own bot reply and any other text you’d like to display in another bot reply.
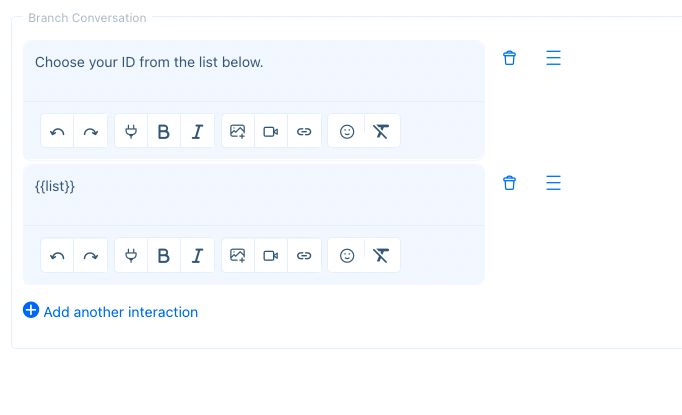
When using the list webhook, be sure to put the webhook in its own bot reply.
Carousel Type
Note: For carousel type lists, we recommend showing only four responses at a time.
Carousel Response
Carousel cards contain an image, a title, and description. Format the carousel webhook response with the following key-value pair:
{"carouselResponse":"<Stringify Carousel JSON>”}
Make sure you use the key ‘carouselResponse’. Modify the Carousel JSON as per your use case. For example, a Carousel JSON object may be formatted in the following way:
{"carouselResponse": {"id":"carousel_card","design":{"title":"cards", "subtitle":"desc","items":[{"Item_id":1,"title":"<Title here>","desc":"<Description Here>", "imgUrl":"<URL Image Link Here>"}]}}}
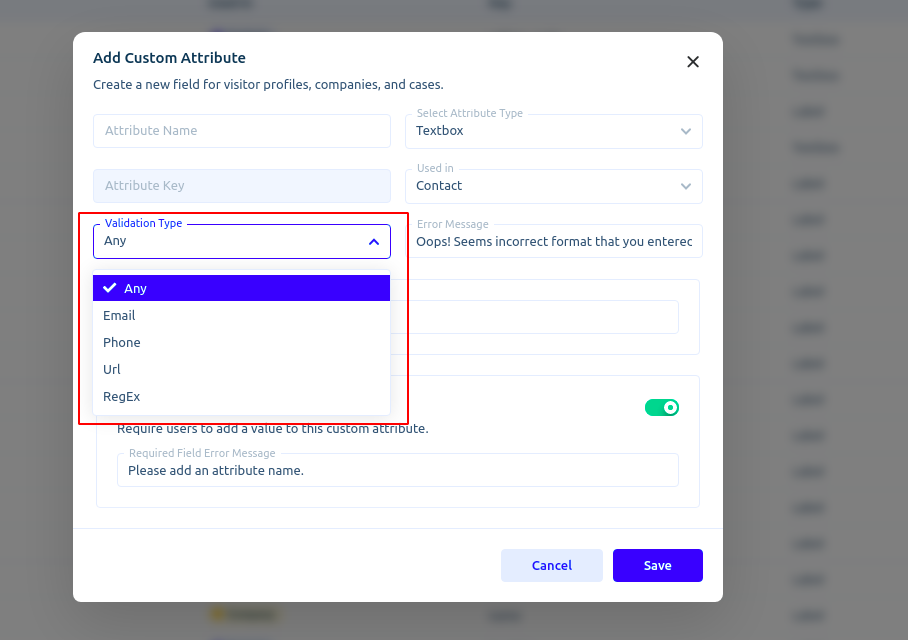
To set up a carousel in a Sequence Bot, create a Custom Attribute to save a visitor’s response. Create Custom Attributes in Settings > Account Settings > Custom Attributes. You may validate user inputs for the Custom Attributes using existing validation types, or you may set up custom RegEx.
Note: Why validate user responses? Visitors may still type whatever they want in the widget, which may lead to unexpected results for your Sequence Bot.
After creating a Custom Attribute, go to Chatbots > Sequence Bot and create a new sequence.
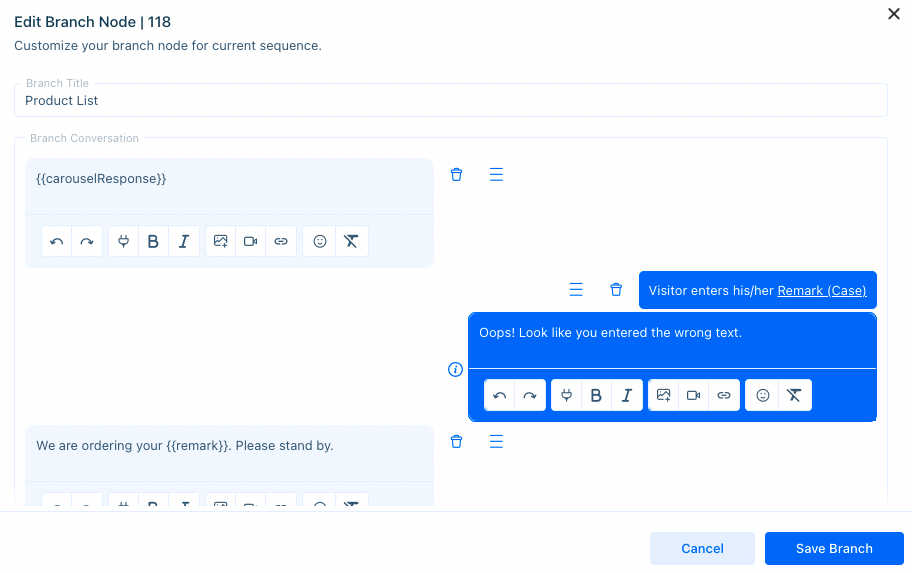
Add your carousel webhook to the sequence. Then, use the ‘Add another action’ button and select ‘Add Visitor Attribute’. Choose the Custom Attribute that will record the visitor’s response.
Finally, add another action to reply to the customer with the Custom Attribute. In the following example, the customer's choice is held in the Custom Attribute {{remark}}.
The bot will display the customer’s choice in the widget.
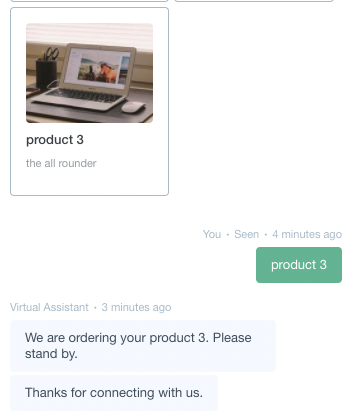
Users will only be able to click on one card at a time.
Browse Carousel Type
Works with: Sequence Bot
Browse Carousel cards have a slightly different design and functionality. They may contain an image, a title, a description, a link, and a footer. Be sure to use the key ‘browseCarouselResponse’ like the example below:
{"browseCarouselResponse":"<Stringify Browse Carousel JSON>”}
Modify the Browse Carousel JSON to suit your use case:
{"browseCarouselResponse": {"id": "browse_carousel_card","design": {"items": [{"title": "<Item Title Here>","desc": "<Item Description Here>","footer": "<Item Footer Here>","openUrl": "<Website link here>","imgUrl": "<Image URL Here>"}]}}}
The card the visitor chooses will redirect them to the openUrl link.
To save your webhook variable, go to Settings > For Developers > Webhooks and press ‘Create New Webhook’.
Paste the webhook name, an email address, and the endpoint. Select ‘Inbound’ and press ‘Refresh Variables’. If the variable does not display, click on ‘Add more variables’ and give the webhook a name.
To use the webhook, go to Chatbots > Sequence Bot and create a new sequence.
In this sequence, a welcome is followed by a browse carousel response. The browse carousel response has been given the custom name {{card}}.
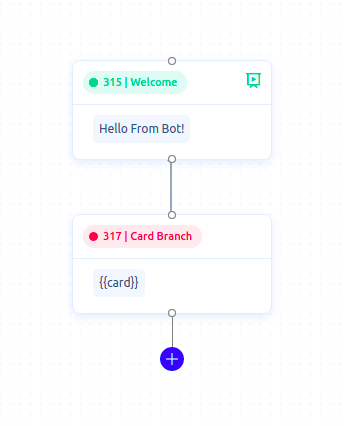
The webhook will display cards. Once the visitor clicks on the card, they will be redirected to a different site. Note that the text surrounding the webhook will not display.
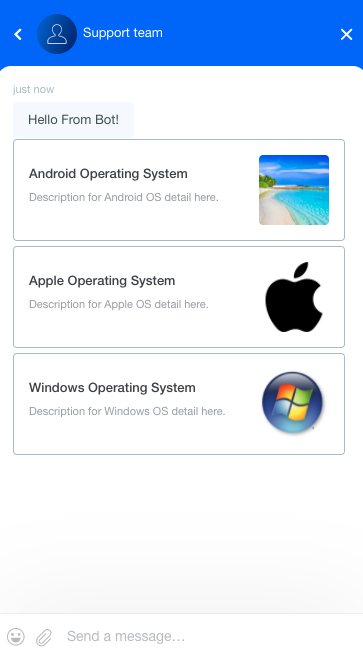
Users will only be able to click on one card at a time.
Routing Based
When building a Sequence Bot, it’s sometimes necessary to route a customer to a branch that’s not part of the usual flow. Webhooks may be used to help you direct customers to specific branches in the same bot. To construct the JSON, provide your webhook response with a “gotoBranch” key and the branch ID value.
In the example below, the webhook will transfer the customer to branch 122. Note that the ID is in string form.
{"gotoBranch":"122"}
You will need to know the branch ID you’d like to route to before constructing your webhook. We recommend building out your Sequence Bot and then constructing your webhook.
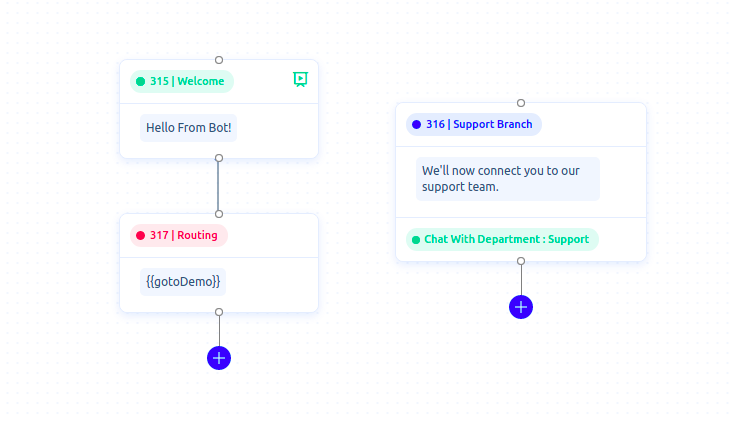
The visitor will be routed to the specified branch. Any text entered in the same field as the {{gotoBranch}} variable will not be displayed.
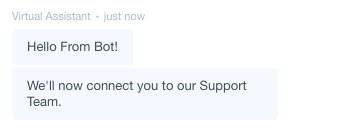
Note: If your sequence does not contain any branch with the ID mentioned, then the bot will ignore the webhook and continue with the remaining flow.
Chat Transfer Based
If you would like to transfer a chat to a particular agent or department during a conversation with a bot, use the chat transfer webhook. You will need the ID of that particular agent or department, which is accessible in Settings > Account Settings > Users and Roles and/or Departments.
The required format is:
{"chatRouteTo":"<Stringify Chat Routing JSON>”}
Modify the Chat Routing JSON to suit your use case. To route to two or more agents or departments, separate the IDs by commas.
Route to agents
{"chatRouteTo":"{"agentIds":"1,2"}"} OR {“agentIds”:”all”}Route to departments
{"chatRouteTo:{“deptIds”:“1,2”}"} OR {“deptIds”:”all”}
Note: We do not support agentIds and deptIds simultaneously.If both are activated at the same time, agentIds will take precedence.
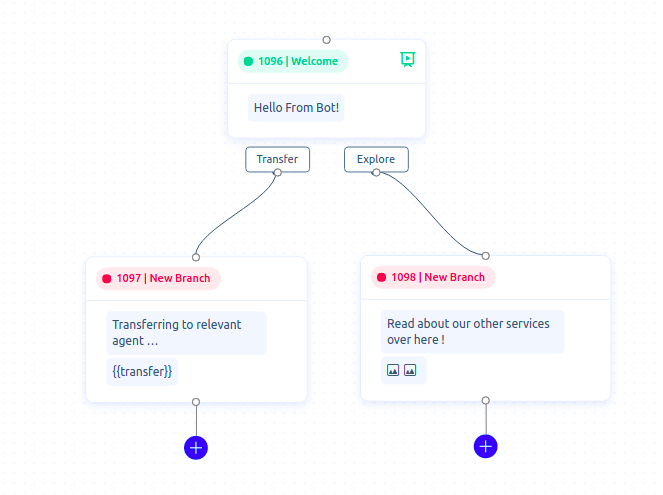
In the example below, if the visitor chooses the ‘Transfer’ branch, they will be routed to the relevant agent.
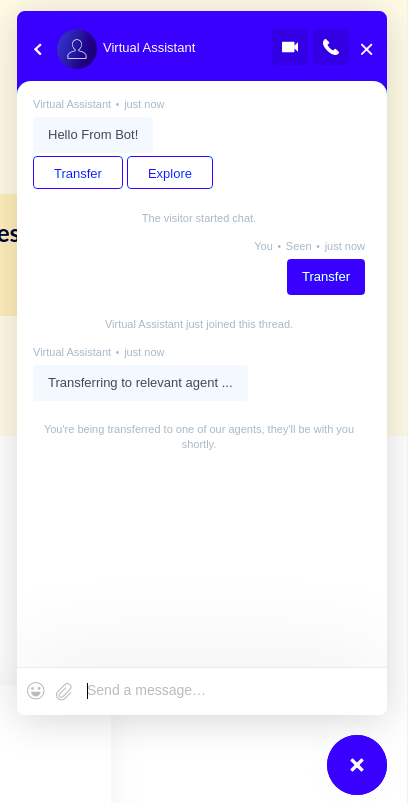
In the visitor’s view, a helpful message lets the visitor know that they’re being transferred to an agent.
Setting a Fallback Response
Set a fallback JSON response under “Fallback response, when webhook URL fails”. The system will try to get a response from the original webhook URL three times. If the system does not get a valid response by then, It will send the fallback response.
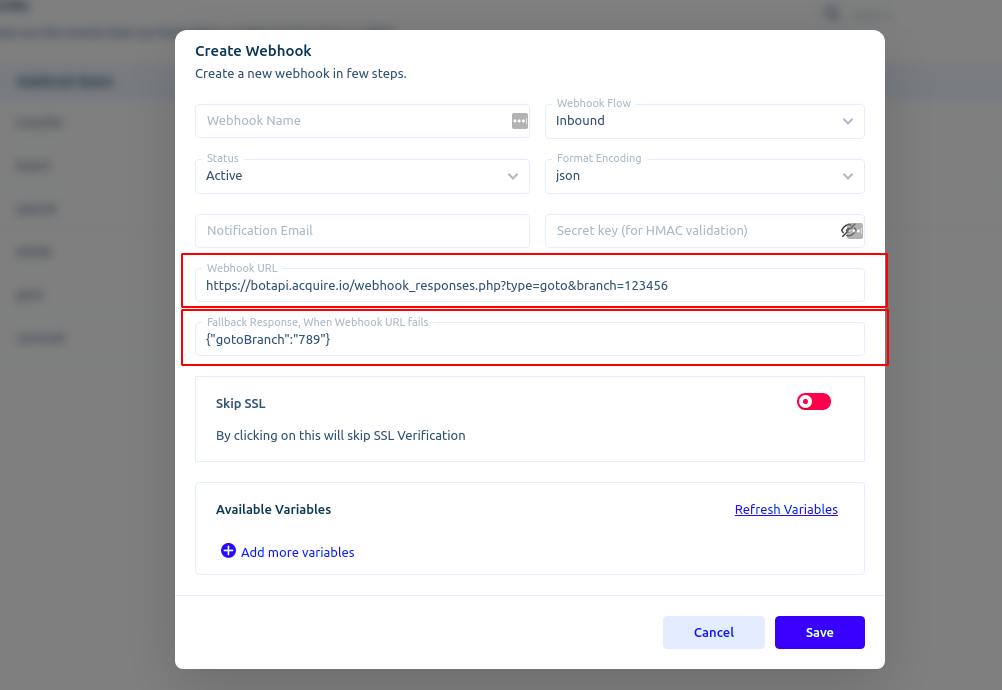
Ex. (as shown in the screenshot above)
If the webhook URL fails, the default response will be {{“gotoBranch”: “789”}}.
You can use this functionality for various purposes (i.e. redirecting to a fallback branch in sequence bot OR showing static card items, etc.)
Webhooks allow you to customize your bot experiences even further. Whether promoting an ever changing list of new products or fluctuating service times, webhooks make these types of interactions possible. Get in touch with your development team and support@acquire.io to see if webhooks are right for your business needs.
Webhook Examples
View and use these examples to better understand our webhook format.
- Regular API Response:
https://botapi.acquire.io/webhook_responses.php?type=regular - Replace Whole Response:
https://botapi.acquire.io/webhook_responses.php?type=anything - Go to Branch:
https://botapi.acquire.io/webhook_responses.php?type=goto&branch=123456 - Carousel Card:
https://botapi.acquire.io/webhook_responses.php?type=carousel - Browse Carousel Card:
https://botapi.acquire.io/webhook_responses.php?type=browse_carousel - Chat Transfer Demo (agents):
https://botapi.acquire.io/webhook_responses.php?type=chat_route_to&route_to=agents&ids=2 - Chat Transfer Demo (departments):https://botapi.acquire.io/webhook_responses.php?type=chat_route_to&route_to=dept&ids=2
- Text-based list: https://botapi.acquire.io/webhook_responses.php?type=list
Was this article helpful?


