Settings
Error: Why am I getting a DKIM error when I set up email?
If you set up your email and find you are receiving a DKIM error, read the sections below to add the DKIM and Return Path records to Acquire and your preferred service. Please note that it could take up to 48 hours to verify DKIM.
In this article:
- Why Did I Receive a DKIM Error?
- Adding and Verifying a New Domain
- Adding DKIM and Return-Path Records to Digital Ocean
- Adding DKIM and Return-Path Records to Gandi
- Adding DKIM and Return-Path Records to GoDaddy
- Resources for Understanding DKIM
Why Did I Receive a DKIM Error?
DKIM is not required for most email services, and so may not have been set up when you started using your inbox. Acquire, and many third-party services that interact with your email, will likely recommend using DKIM or another security standard to ensure email integrity.
To set up DKIM information, you should create an inbox and verify a new domain.
Adding and Verifying a New Domain
Step 1. Navigate to Settings > Installation and Setup > Email Setup.
Step 2. Select ‘Add New Inbox’.
Step 3. Fill in the inbox name and email address. If you’d like to assign the inbox to a department, select it from the drop-down list.
Step 4. Once you’ve added an inbox, you need to verify it. Click on ‘Send Verification Email’. We’ll send an email to the registered address, that you’ll need to verify.
Step 5. Once the account is verified, you’ll receive a forwarding address. Set the forwarding address in your inbox.
Step 6. If the domain has not been verified, you’ll see a yellow warning label ‘DKIM Info Missing’.
Step 7. You’ll need Acquire’s return path and DKIM record info to continue. To find this, open your DKIM information by clicking on the carrot symbol (‘∨’) next to the label and select ‘Channel Info’ from the drop-down.
Step 8. Acquire will provide a DKIM record and return path that needs to be added to your DNS in order to verify the domain.
Step 9. Once the DKIM Hostname and Value is added to your DNS, select ‘Click Here’ from the ‘Channel Info’ menu. Acquire will check and try to verify your domain.
Step 10. After the DKIM is verified, a green checkmark will appear next to the domain in your Channel Information.

Adding DKIM and Return-Path records to DigitalOcean
Obtain the DKIM and Return-Path records from Acquire App
In Acquire, obtain the DNS records to add to your domain’s DNS from the Settings > Installation and Setup > Email Setup by clicking on the carrot next to the DKIM Info Missing label. Select ‘Channel Info’ from the drop-down menu.
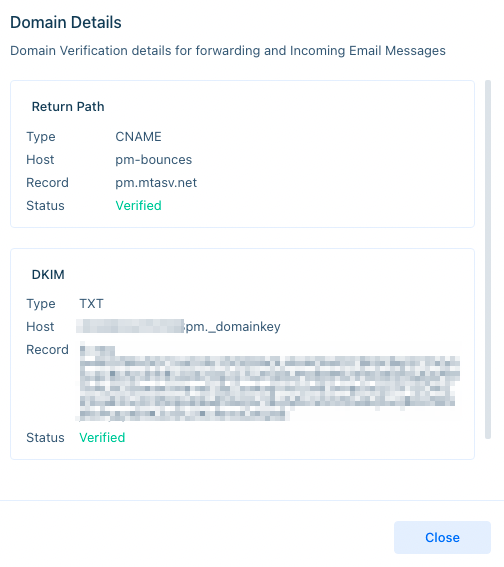
Once there, you will see the records for the Return-Path and DKIM.
These records will be used once you log in to DigitalOcean, so keep the window or tab open or copy to a word document.
Adding Records to DigitalOcean
Step 1. Log in to DigitalOcean and choose Manage > Networking.
Step 2. Once you are in the Networking section, choose ‘Domains’ on the left.
Step 3. Click on ‘More’ next to the domain you'd like to add the DKIM and Return-Path record to, then select ‘Manage domain’.
Step 4. To add your DKIM record, select ‘TXT’ from the type list. In ‘Value’, enter the DKIM Record from the channel info page on Acquire. In ‘Hostname’, enter the DKIM Host from the channel info page on Acquire.
IMPORTANT: The text added for each record must be surrounded by quotes.
Step 5. In the ‘DNS records’ section, add the CNAME record in a similar fashion. Be sure to change the record type to CNAME and then for the ‘Name’ enter in the ‘Hostname from’ field. For the value, enter pm.mtasv.net.
Once both records are added, you will see them in your list of DNS records in Digital Ocean. For DKIM, Acquire uses Postmark to check your DNS records every five minutes to see if they are valid. Once identified, the DKIM record will be verified automatically. You may also click on the ‘Verify’ link to manually check the DKIM record.
Adding DKIM and Return-Path records to Gandi
Obtain the DKIM and Return-Path records from Acquire App
In Acquire, obtain the DNS records to add to your domain’s DNS. From Settings > Installation and Setup > Email Setup, click on the carrot next to the ‘DKIM Info Missing’ label. Select ‘Channel Info’ from the drop-down menu.
Once there, you will see the two records for DKIM and Return-Path that need to be added to your DNS.
These records will be used once you log in to Gandi, so keep the DNS Settings window or tab open or copy the information to a word document.
Adding the DKIM and Return-Path Records to Gandi
Step 1. Log in to Gandi, click on the ‘Domains’ tab in the left-hand toolbar, and select the domain associated with the email address.
Step 2. Click the ‘DNS Records’ tab.
Step 3. Click ‘Add’ to add a new record.
Step 4. Add the CNAME record. In the ‘Type’ drop-down, select CNAME.
Step 5. In most cases, leave the TTL as it is.
Step 6. In the ‘Name’ field, enter the Hostname value from the Return-Path record. In the Hostname field, enter pm.mtasv.net. Then click ‘Create’.
Step 7. Click ‘Add’ again to add another record for DKIM. For the Type, select ‘TXT’ from the drop-down.
Step 8. In the Name field, enter the DKIM ‘Host’ value. It will be in the format of 2020040212345pm._domainkey. In the ‘Text Value’ field, enter the value for the DKIM Record. Then, click ‘Create’.
Step 9. In Acquire, in the ‘Channel Info’ menu of your email setup, finish verifying the CNAME and DKIM records by clicking on the ‘Click Here’ link.
If everything is propagated correctly (which can take up to 48 hours for new DNS records), you will see a green checkmark in your Sender Signatures page meaning that the domain has been verified. You can now send emails from any address on that domain.
Adding DKIM and Return-Path Records to GoDaddy
Obtain the DKIM and Return-Path records from Acquire App
In Acquire, obtain the DNS records to add to your domain’s DNS from the Settings > Installation and Setup > Email Setup by clicking on the carrot next to the DKIM Info Missing label. Select ‘Channel Info’ from the drop-down menu.
Once there, you will see the two records for DKIM and Return-Path that should be added to your DNS.
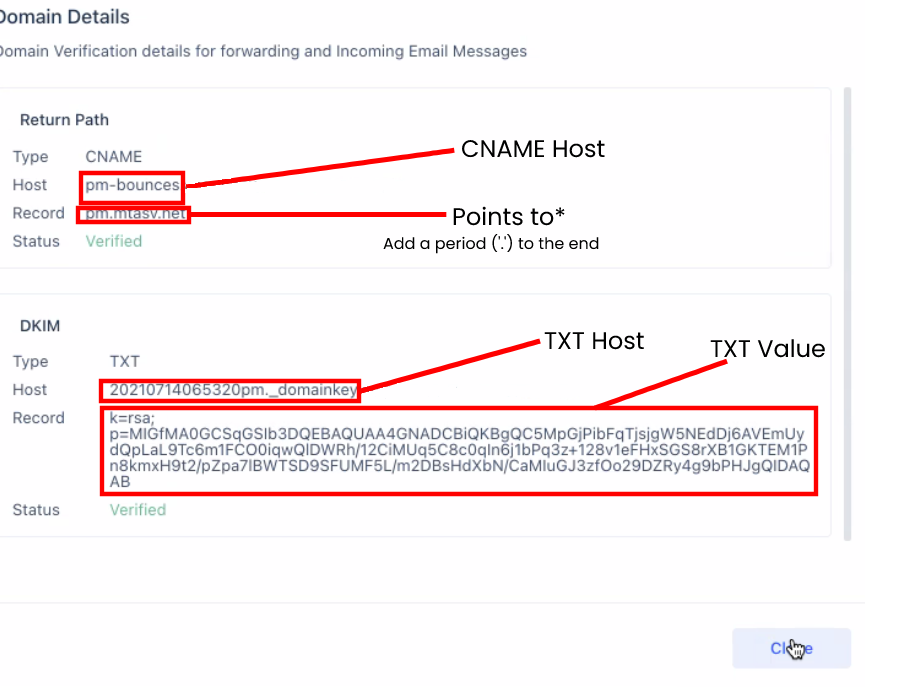
From Return Path:
- CNAME (e.g., pm-bounces)
- Host (e.g., pm.mtasv.net.)
From DKIM:
- Host (e.g., 2021071406532pm._domainkey)
- Record

These records will be used once you log in to GoDaddy, so keep the window open or copy the information to a word document.
Adding DNS Records to GoDaddy
Log in to GoDaddy and go to your ‘Dashboard’.
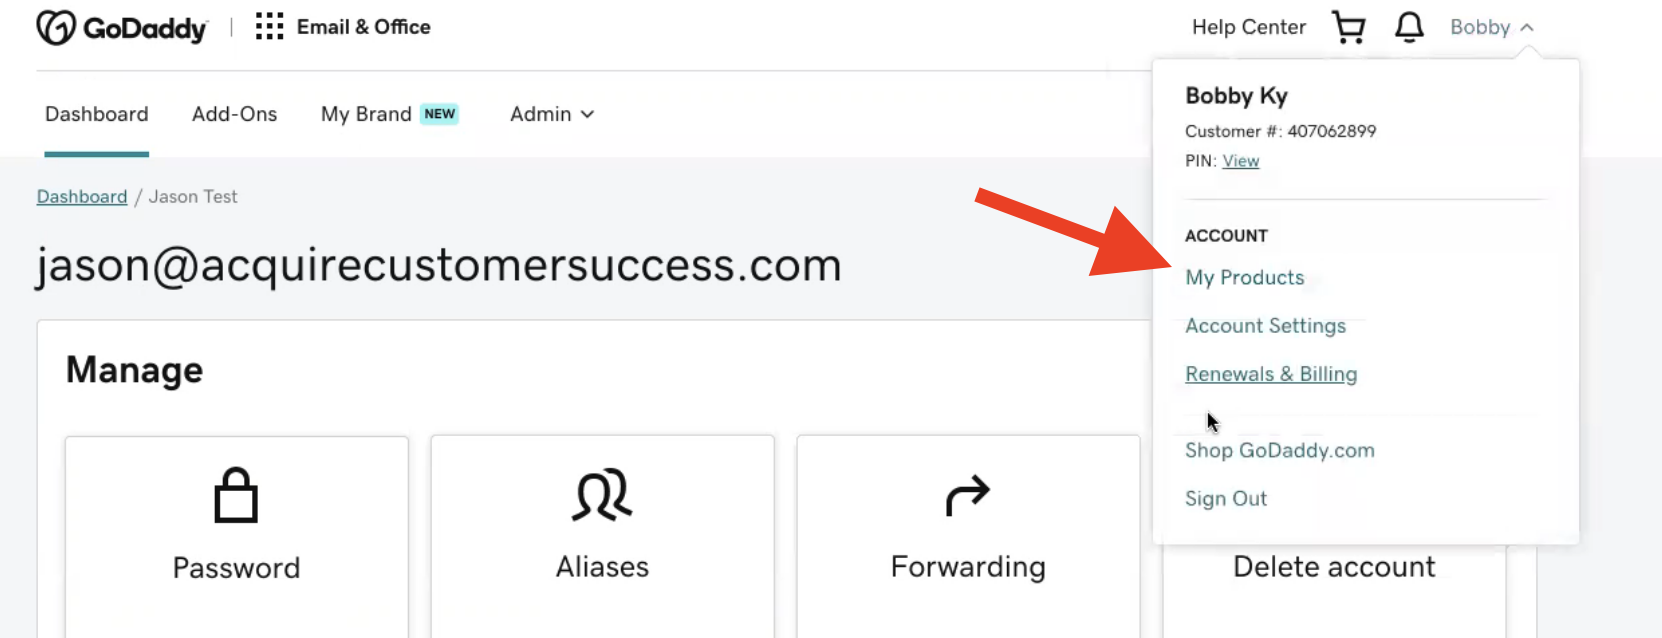
Click on the drop-down menu next to your username and click on ‘My Products’.

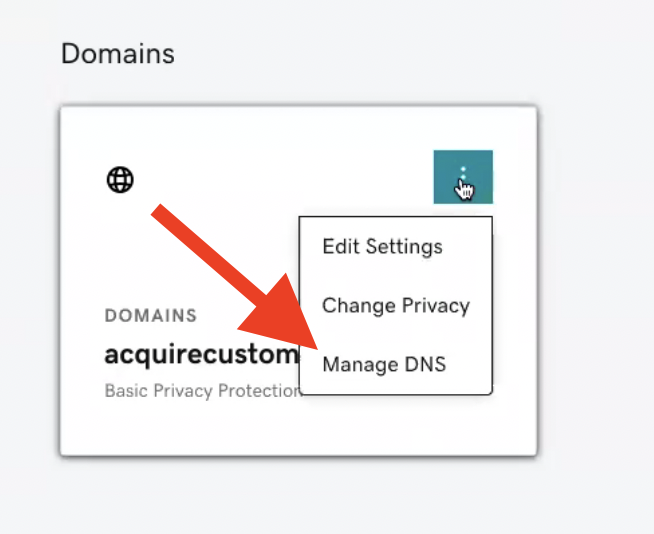
Go to the Domains section. You may need to scroll down. Click on the vertical ellipses (‘⋮’) and select ‘Manage DNS’.

Click on ‘Add’ at the bottom of the records list.

Adding the CNAME Record
In the new menu, select ‘CNAME’ from the ‘Type’ drop-down menu.
Paste your Return Path Host. Your Host should be the text before the domain name. In this example, the Host is pm-bounces. We have removed everything except the subdomain from pm-bounces.acquirecustomersuccess.com.
The host should point to the Return Path Record. Ensure the period (‘.’) is at the end of the record. In this example, the Return Path Record is pm.mtasv.net.

It may not be necessary to change the default 1 Hour TTL (time to live). Learn more about TTL in the Resources section at the end of this article.
Press ‘Save’ to save the CNAME record.
Adding the Return-Path record
Press ‘Add’ to add the TXT record.
Select ‘TXT’ as the ‘Type’.
In 'Host', paste the DKIM Host from Acquire. It should be everything up to domainkey. For example, 2021071406532pm._domainkey. A period is not needed after domainkey.
In 'TXT Value', paste the entire DKIM record.

It may not be necessary to change the default 1 Hour TTL (time to live). Learn more about TTL in the Resources section at the end of this article.
Verifying the Records
It may take some time for DNS records to propagate. DNS verification can take up to 48 hours, though usually will be completed in a few minutes. We recommend waiting 30 minutes before verifying the records. For DKIM, Postmark (the service Acquire uses) will check your DNS records every five minutes to see if it is valid. You may also execute a manual check by clicking the ‘Verify’ button in the DKIM row in your Channel Info page in Acquire. Clicking the ‘Verify’ button in the Return-Path row will also check to see if that record can be found in your DNS to verify it in Postmark.
If everything is propagated and working, you will see a check mark that DKIM has verified. Once your domain is verified, you’ll be able to send emails from any address on that domain.
After 24 hours, if you have added the records and Acquire’s Domain Details still have an Unverified Status, reach out to support@acquire.io.
Resources for Understanding DKIM
- DKIM: What Is It and Why Is It Important?
- Set up DKIM to prevent email spoofing
- What is DNS TTL + Best Practices
Was this article helpful?


