Chatbots
FAQ: What are some best practices for building a Conversational Bot?
In this article, we’ll explore how to build a Conversational Bot based on best practices explored by us and our customers. Not only are Conversational Bots a great way to inform visitors, but when built out thoughtfully, they can also deflect inquiries and save your agents time.
To see a more general overview, check out How to Build & Deploy a Conversational Bot→
In this article:
- Best Practices for Writing Conversational Bot Questions
- Creating a Loop
Best Practices for Creating Conversational Bot Questions
Creating a robust Conversational Bot may take time and investment. However, you can get started quickly and avoid pitfalls by following a few best practices.
General Purpose Bot vs. Specific Bot
There are many ways to organize your Conversational Bots. You may create as many Conversational Bots as you want, but Conversational Bots cannot interact with other Conversational Bots directly. You’ll need to use a Sequence Bot to connect Conversational Bots to other Conversational Bots.
Customers find it helpful to split their Conversational Bots into two types: General Purpose and Specific Purpose.

Customers find it useful to create these types of bots:
- Returns
- Pricing
- Features
- FAQ Bot/General Purpose
- Out of the Office/After Hours
Choosing the right type of bot will be up to your use case and how frequently your visitors interact with it.
For example, if you’d like to implement multiple Conversational Bots, you’ll need a Sequence Bot to help route visitors to the Conversational Bots they need.
Sequence Bot that Routes Visitors to Conversational Bots
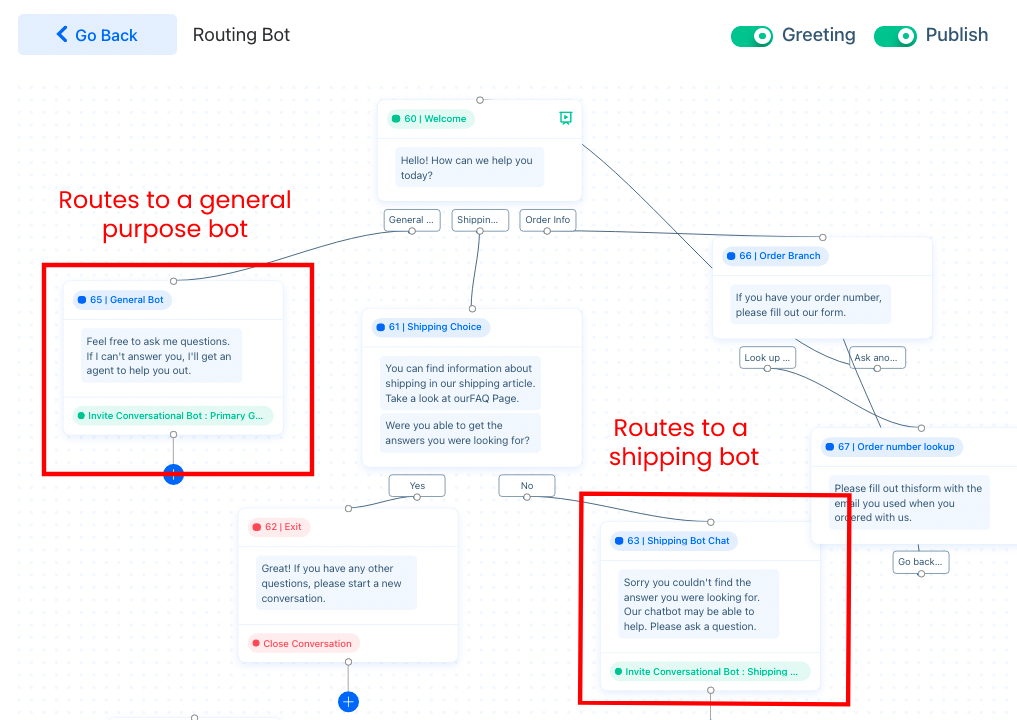
In this Sequence Bot example, a visitor may choose to interact with a general purpose conversational bot, a bot that specializes in shipping, or they may look up their order information.
Using Synonym Syntax and Variations
The synonym syntax allows you to create a question variation with similar words. Wrap your synonyms in curly braces (‘{}’) separated by pipes (‘|’) to create a question that accounts for the different ways visitors speak.
- What is the { cost | charge | rate | pricing } of shipping?
Visitors may also ask questions in different ways. You may add variations to similar questions by clicking on ‘Add another variation’ in the Conversational Bot menu.

When you create variations you are training the bot to respond to different versions of the same question. It’s usually a good idea to brainstorm a few at first.
Your visitors will likely come up with more variations that you initially account for. In that case you can enable ‘Push to Smart Suggestions’ in Chatbots > Configuration to save questions that the bot hasn’t encountered.
Depending on your volume, it may be a good idea to review suggested questions every week or so and add them to your Q&A list.
Complete and Partial Sentences
When you write conversational questions, you might start off by creating variations based off of a common question. For example, you might create two different versions to account for questions that ask about your shipping costs such as:
- How much is shipping?
- What is the { cost | charge | rate | pricing } of shipping?
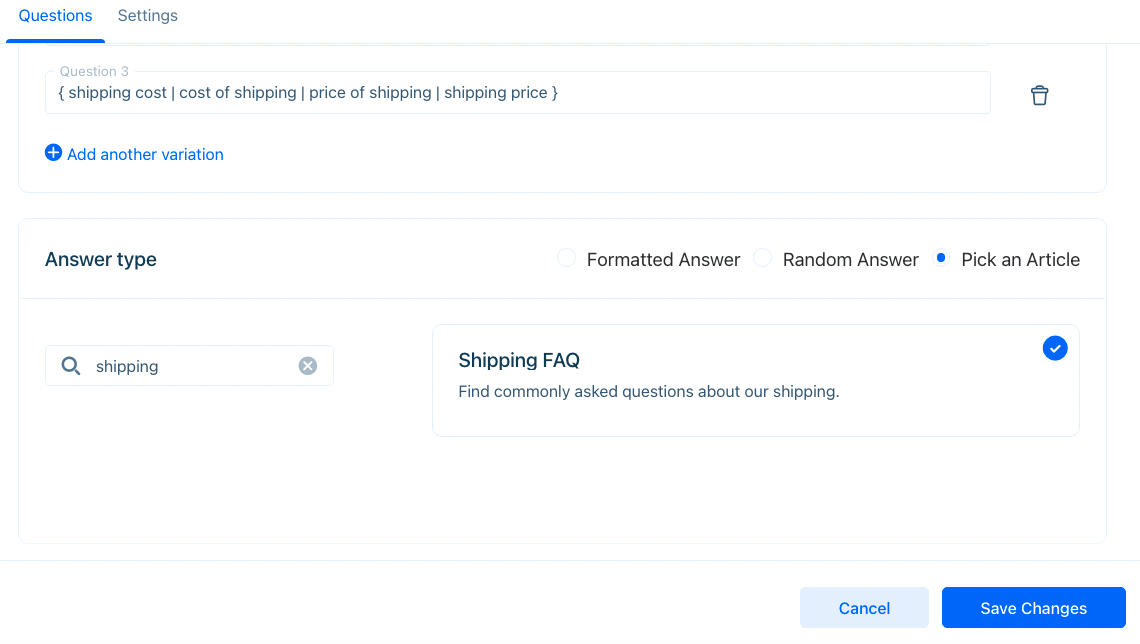
However, not every customer has time to type a complete sentence. To account for this, try writing questions with keywords:
- { shipping cost | cost of shipping | price of shipping | shipping price }
You may continue to use the synonym syntax to organize similar phrases in one place.
Keep in mind that one-word questions will activate the chatbot’s auto-reply response, so we recommend using at least two words in your questions.
Suggesting Related Questions
Creating variations can be one way to account for visitor behaviors, but there will likely be times when visitors need a bit of help asking the right question. Under the ‘Setting’ tab, you may enable ‘Suggest Related Questions’ to give the visitor the option of clicking on related questions.
This option can also be used to provide default responses, such as providing an option to speak to an agent. When a visitor chooses that question, any post actions on that question will also activate.
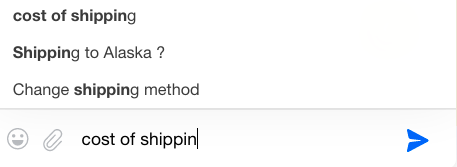
If a visitor types a set of words the bot is familiar with, a suggestion list will appear in the widget.
Provide Links to Articles
Another option is to provide links to articles when creating a Conversational. If your organization has a FAQ, you may easily link to that FAQ using the ‘Pick an Article’ option of the Conversational Bot. However, just because a question is stated in the FAQ doesn’t mean it shouldn’t also be included in the Conversational Bot.
Creating a Loop
A loop is a workflow that allows the Conversational Bot to answer another question after failing the first one. This bot frees up agent time by encouraging visitors to ask their questions a different way. Only when the bot is unsuccessful a second time does the question go to an agent.
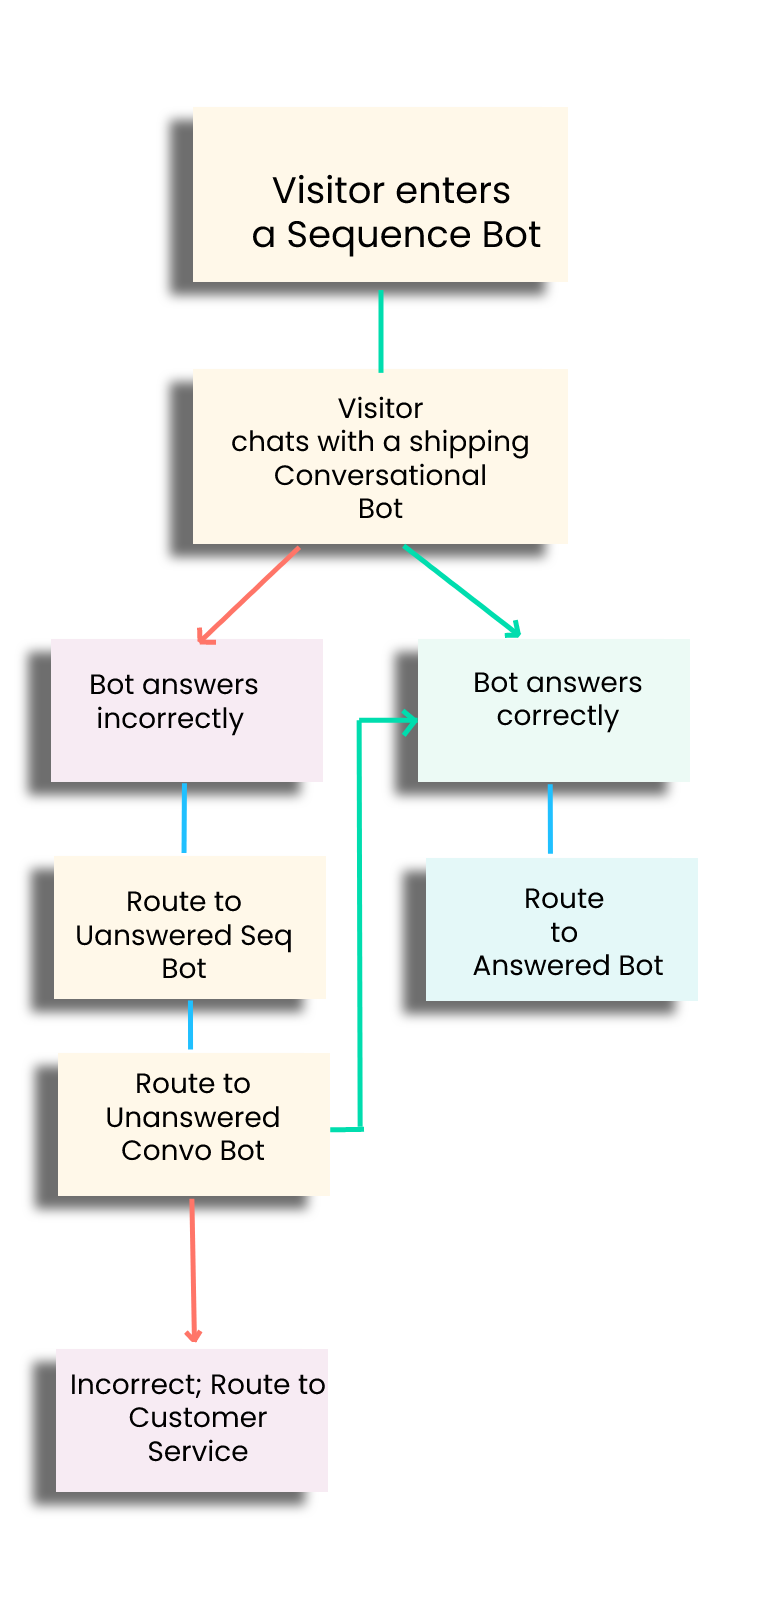
Simply put, if a Conversational Bot fails to answer a visitor correctly the second time, that visitor is routed to customer service. A more detailed explanation is below:
In this diagram, a visitor enters a chat with a Sequence Bot. They are then routed to a Conversational Bot that specializes in questions about shipping.
- If the bot is able to answer the visitor’s question, the visitor is routed to an Answered bot.
- However, if the bot answers incorrectly, the visitor is routed to an Unanswered Sequence Bot that routes to an Unanswered Conversational Bot.
- If the Unanswered Conversational Bot answers correctly, the visitor is routed to the Answer bot (not shown).
- If the Unanswered Conversational Bot answers incorrectly, the visitor is routed to Customer Service.
To implement this behavior, you’ll need to create two Sequence Bots to handle answered and unanswered questions, a Sequence Bot to route questions to.
Step 1: Creating a Conversational Chatbot (General or Specific Purpose)
In order to get the most use out of this tutorial, you’ll want to create a bot that makes sense for your use case. Perhaps you have an article web page about commonly asked questions. Use those questions in your Conversational Bot. You may also want to create a general purpose bot to handle less specific inquiries.
In this example, we’ll create a Specific Purpose bot that specializes in questions about shipping.
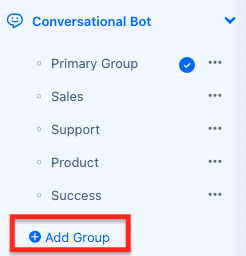
In Chatbots > Conversational Bot, create a new group by clicking on ‘Add Group’. Name and describe the bot and enable System Feedback.
If you have a CSV file of questions, select the drop-down menu in ‘Add New Question’ to import that file. You may also add questions manually by clicking on ‘Add New Question’. Be sure to include a few variations for each question.

Once you’ve created questions and answers for the bot, export the questions by clicking on the action button (lightning bolt) and selecting ‘Export All’.
The questions will be exported as a CSV file. Keep the CSV file handy, as we’ll need it for the next bot.
We’ll also need to create other bots before creating follow-up actions for these questions, so for now, go on to the next step.
Step 2: Creating the Unanswered Conversational Bot
We’ll need to handle what happens when a visitor asks the same question the second time. To do this, we’ll create another Conversational Bot.
This bot will store all the questions we’ve created in the Shipping bot (as well as any other Conversational Bots we’ve made).
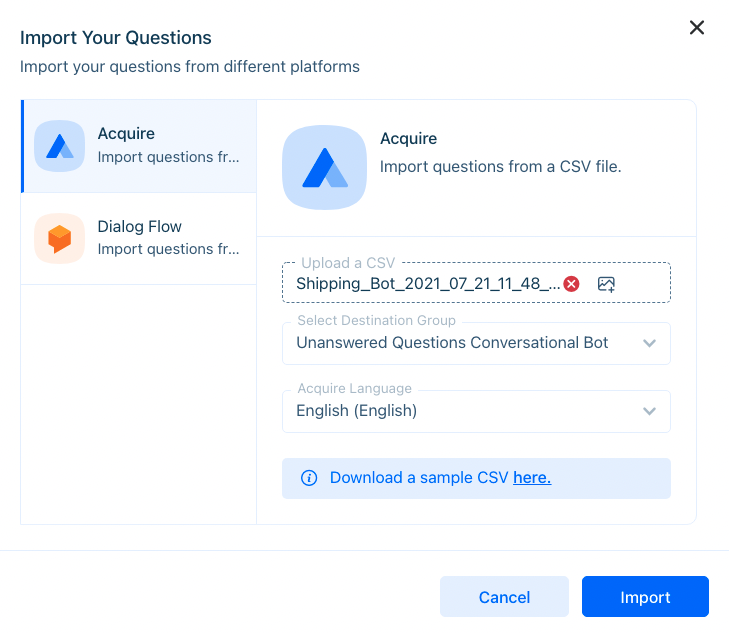
Click on ‘Add Group’ and name the new group ‘Unanswered Questions Conversational Bot’. Then click on the drop-down button on ‘Add New Question’ and select ‘Import Questions’. Upload the CSV file that you generated in Step 1. Then press ‘Import’.
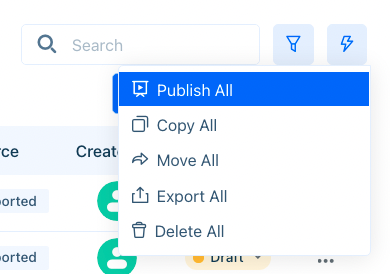
After uploading, change the status of all questions to ‘Published’ by clicking on the action (lightning bolt) button and selecting ‘Publish All’.
If you have other Conversational Bots you’d like to create a loop for, you can import those questions as well.
We’ll need to create another bot to handle the loop process, so for now, leave the questions as they are and go to the next step.
Step 3: Creating the Unanswered Sequence Bot
Create an Unanswered Bot to handle the first time the bot gets a question wrong.
In Chatbots > Sequence Bot, create a new blank sequence and name it ‘Unanswered Questions Sequence Bot’. Double click on the ‘Welcome’ branch to edit it.
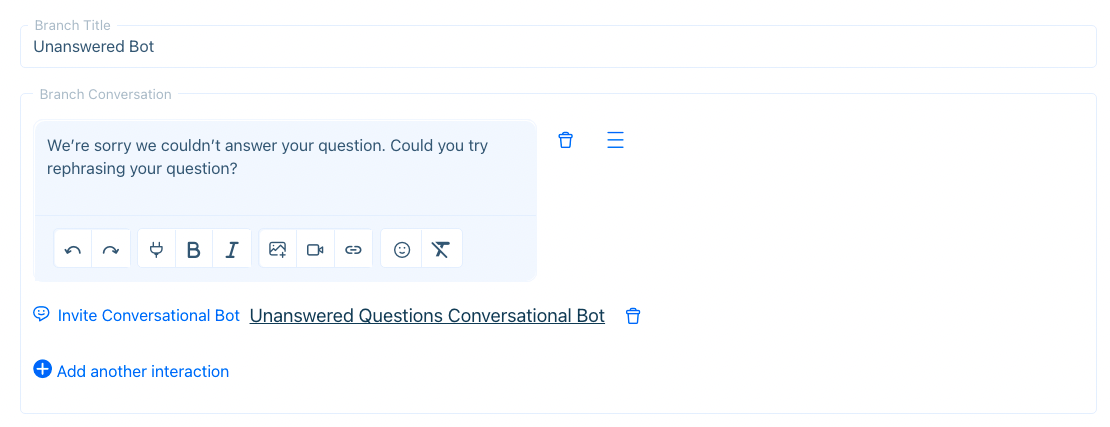
In the branch creation menu, type in the bot reply: ‘We’re sorry we couldn’t answer your question. Could you try rephrasing your question?’ or a similar phrase.
Then, click on 'Add Another Interaction' > 'Add Auto Actions' > ‘Invite Conversational Bot’ and select ‘Unanswered Conversational Bot’. Then ‘Save’ the branch.
This is all you’ll need to do with this bot.
Step 4: Creating an Answered Bot
We’ve covered what the bot does in the event it gets the answer wrong. Now, let’s create a bot that handles a situation where the answer is correct.
Go to Chatbots > Sequence Bot and create a new blank Sequence Bot. Name it ‘Answered Questions Sequence Bot’.
You’ll probably want to give your visitor the opportunity to ask another question or close the chat. To do that, write text in the text box and then add two bubble options titled ‘Ask Another Question’ and ‘Close Conversation’. Then press ‘Save Branch’.
Beneath the Close Conversation bubble, click on the plus sign ‘+’ and edit the new branch. Delete the bot reply and click on ‘Add another interaction’. Select ‘Add Auto Actions’ and then select ‘Close Conversation’. The press ‘Save Branch’.
Beneath the ‘Ask Another Question’ bubble click, click on the plus sign ‘+’ and edit the new branch. Write helpful text such as “Please ask another question” in the bot reply. Then click on ‘Add Another Interaction’ and ‘Add Auto Actions’ and choose ‘Invite Conversational Bot’. Then, select the ‘Shipping Bot’ (or the name of the bot you’d like to route to). Then click on ‘Save Branch’.
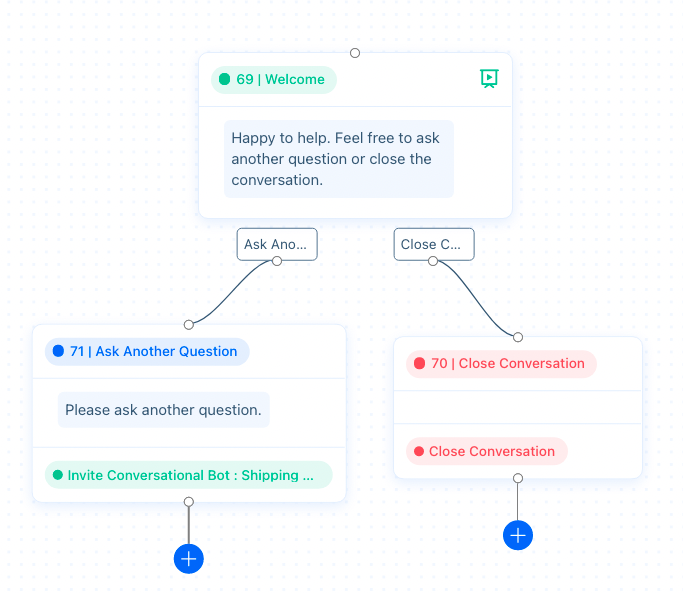
When the Conversational Bot answers a question correctly, this sequence bot gives the visitor the option to ask another question or close the chat.
Step 5: Connecting the Bots
Congratulations! We’ve built all the bots we need for this process. Now we just need to connect them.
Connect the Unanswered Question Conversational Bot
Go back to your ‘Unanswered Question Conversational Bot’ and set ‘Enable Post Actions’ to green (right) for each question. Select ‘Follow Up’ as the action and type in the reply “Did this answer your question?”
Add two bubble options. In the first option, type ‘Yes’ as the button text and invite the Answered Sequence Bot. This will route the visitor back to the Conversational Bot where they can continue asking questions.
In the second option, type ‘No’ and select ‘Chat with Agents’ or ‘Departments’ and then select the agents or departments you’d like the visitor to be routed to.
Be sure to click on ‘Save Changes’.
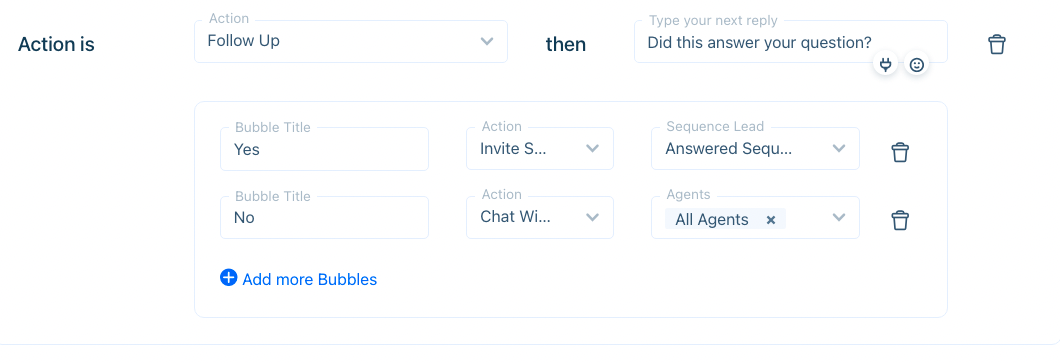
Connect the Shipping Conversational Bot
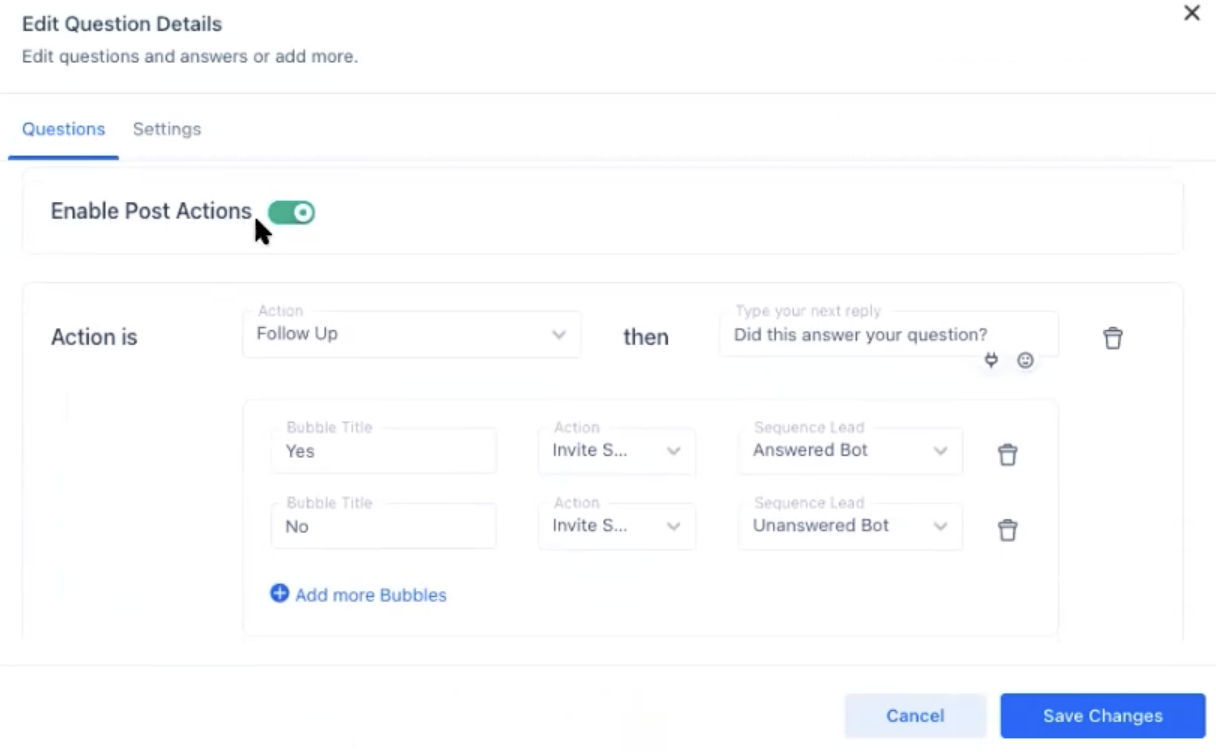
Go to your ‘Unanswered Question Conversational Bot’ and set ‘Enable Post Actions’ to green (right) for each question. Select ‘Follow Up’ as the action and type in the reply “Did this answer your question?”
Add two bubble options. In the first option, type ‘Yes’ as the button text and invite the 'Answered Sequence Bot'. This will route the visitor back to the Conversational Bot where they may continue asking questions.
In the second option, type ‘No’ and select ‘Invite Sequence Bot’ and then select the ‘Unanswered Sequence Bot.’
When finished, be sure to click on ‘Save Changes’.
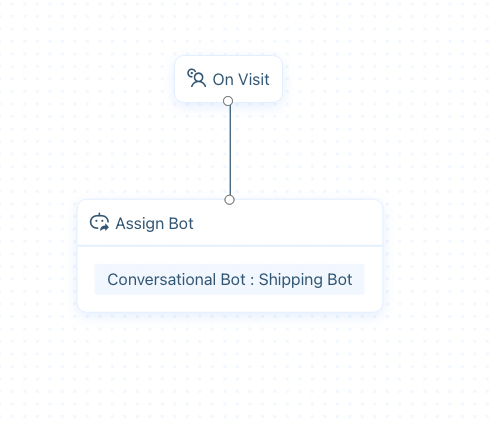
To activate this bot, go to Settings > Workflow > Business Rules and create a new chat rule or add to an existing one. Then, assign the primary bot to the rule and set the rule’s status to active (green, right).
You’ve built all the logic you need to create a loop strike process. Remember, this process can be tied into other Sequence Bots as well. You can keep building it to account for visitor behavior.
Last Step: Enable Smart Suggestions
Your visitors will sometimes have unpredictable ways of asking their questions. The good news is that you’ll be able to record these questions and add them to the Conversational Bot with a few button clicks.
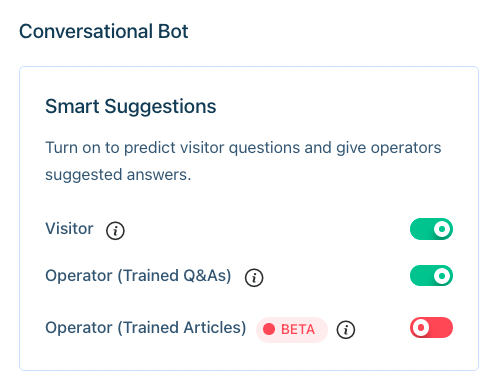
Keep a record of what your visitors ask by enabling smart suggestions for Visitors and Operators (Trained Q&As) in Chatbot > Configurations.
When an agent looks through a Conversation on the Dashboard, they can push questions to Suggested Questions. An Administrator should take a look at the questions from time to time and determine which ones should be added to the bot.

We've just built a bot that implements a one-strike process for answering visitor questions.
Building a looping process takes a bit of time, but pays off in the long run by freeing up agents. Instead of answering the same question over and over, a bot will now be able to assist visitors. You can also incorporate this behavior into other Sequence Bots to create a complex, but ultimately user-friendly experience.
Have more questions? Reach out to us at support@acquire.io.
Was this article helpful?


